

The key to building strength after 65 without injury isn’t avoiding effort, but applying intelligent, ‘productive stress’ to your body.
- Gentle cardio actively builds more cellular energy factories (mitochondria) than napping does.
- Movement itself is the best lubricant for stiff joints, and the right nutrition provides the ‘go’ signal for muscle repair.
Recommendation: Focus on gentle, consistent movement and protein-rich meals to stimulate your body’s natural strength-building systems safely.
The desire to feel strong and capable doesn’t fade with age, but the fear of a wrong move leading to a setback often grows. For many over 65, the question isn’t whether to get stronger, but how to do so when every joint seems to protest. You’re told to “take it easy,” but that very advice can lead to a frustrating cycle of weakness and stiffness. This feeling of fragility, the fear that pushing yourself might lead to injury, is a significant barrier to regaining the vitality you deserve.
The conventional wisdom offers a scattered list of solutions: do some walking, try swimming, eat a bit more protein. While not wrong, this advice misses the fundamental principle. It treats the body like a fragile machine to be managed, rather than a dynamic, adaptable system that can be coached back to strength. The real challenge isn’t just picking the “right” exercise; it’s understanding the science behind what makes your body stronger, more energized, and more resilient, without over-stressing your joints.
What if the solution wasn’t about avoiding all strain, but about mastering the science of ‘productive stress’? This article will shift your perspective. We will move beyond generic advice and delve into the mechanisms that allow you to build real strength and boundless energy safely. We’ll explore how to turn on your body’s cellular energy factories, why movement is a better cure for stiffness than rest, and how your breakfast can be a powerful tool against muscle loss.
This guide provides a clear, science-backed roadmap. We will break down the strategies, from choosing the right exercises for your goals to understanding the simple nutritional swaps that make all the difference, empowering you to build a stronger, more resilient body from the inside out.
Summary: A Practical Guide to Building Joint-Friendly Strength After 65
- Why Low-Impact Cardio Increases Daily Energy Levels More Than Napping?
- How to Perform a Full-Body Yoga Routine From a Seated Position?
- Pilates for Core or Tai Chi for Balance: Which Suits Your Goals?
- The “Resting Too Much” Trap That Worsens Joint Stiffness
- When to Push Your Heart Rate for Maximum Cardiovascular Benefit?
- Why Your Breakfast Toast Is Contributing to Sarcopenia?
- Why Resistance Bands Are Safer Than Dumbbells for Osteoporosis Patients?
- How to Build a Cardio Routine That Protects Knees and Hips?
Why Low-Impact Cardio Increases Daily Energy Levels More Than Napping?
It seems logical: when you feel tired, you should rest. While a nap can offer a temporary reprieve, it doesn’t solve the underlying issue of low energy. The surprising truth is that consistent, low-impact cardiovascular exercise is far more effective at building lasting energy. The reason lies deep within your cells, in what we can call your ‘cellular engines’—the mitochondria. These tiny powerhouses are responsible for converting food and oxygen into the energy that fuels every single one of your body’s functions.
As we age, the number and efficiency of our mitochondria can decline, leading to that familiar feeling of fatigue. A nap does nothing to change this. However, gentle cardio acts as a powerful signal to your body to build more and better cellular engines. It creates a ‘productive stress’ that forces your system to adapt. In fact, research is incredibly clear on this point. One powerful study confirmed that when previously sedentary individuals engaged in moderate exercise, they saw a 50.7% increase in mitochondrial volume density after just 16 weeks.
This isn’t just a number; it’s a physical upgrade to your body’s energy production system. As Broskey et al. found in their research on sedentary older adults, physical activity is a greater determinant of your energetic capacity than aging itself. By engaging in activities like brisk walking, cycling, or swimming, you are not spending energy—you are investing in the very infrastructure that creates it. You are telling your body to build a bigger, more efficient power grid, resulting in more sustained energy for all your daily activities, long after the workout is over.
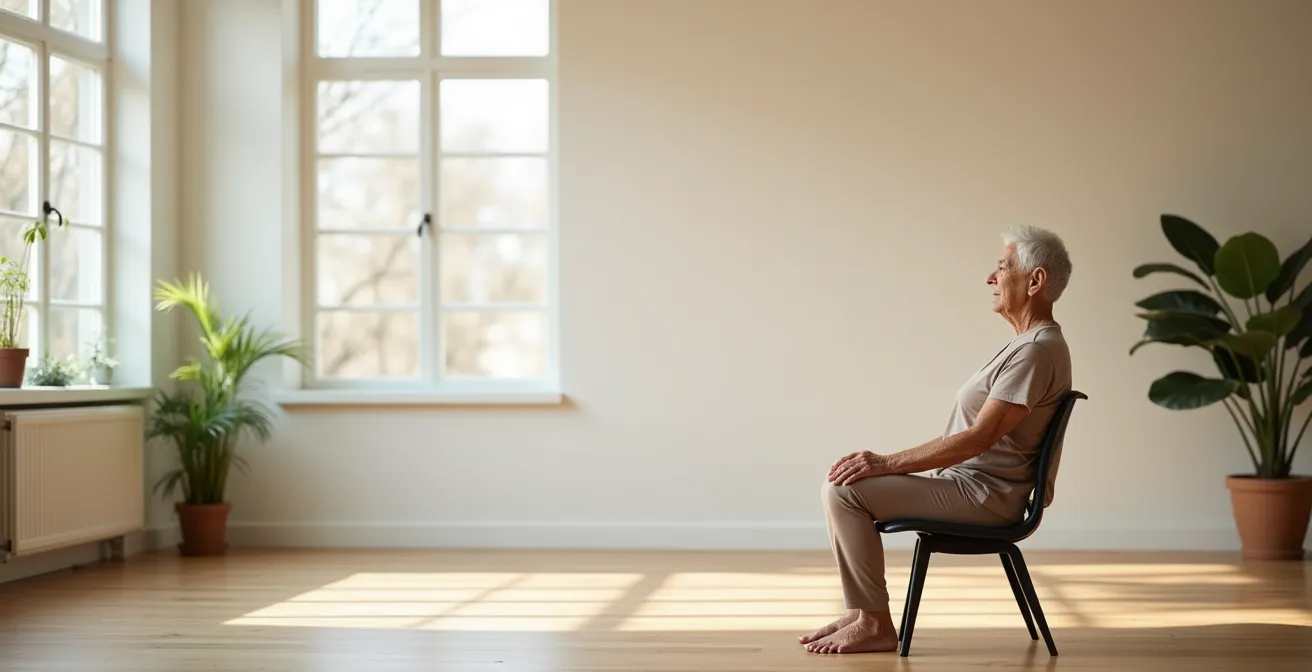
How to Perform a Full-Body Yoga Routine From a Seated Position?
The benefits of yoga—flexibility, mobility, and a calm mind—are not reserved for those who can easily get down on the floor. Chair yoga provides a safe, stable, and highly effective way to access these advantages, making it a perfect tool for building functional strength. It allows you to mobilize your spine, strengthen your core, and stretch key muscles, all while being fully supported. This is ‘productive stress’ in its gentlest form, encouraging movement and circulation without putting any strain on your hips or knees.
A successful seated routine focuses on the fundamental movements that translate directly to daily life: breathing correctly, twisting, bending, and extending. By practicing these motions in a controlled way, you are retraining your body to move with greater ease and less pain. The following routine can be performed on any sturdy, armless chair and serves as an excellent full-body “movement snack.”
As you move through these poses, focus on the quality of the movement rather than the depth. The goal is to feel a gentle stretch and activation, never sharp pain. Consistency is more important than intensity. A short, 10-minute routine performed daily will yield far greater benefits for your mobility and energy levels than a long, infrequent session.
- Start with seated diaphragmatic breathing: Place one hand on your belly and breathe deeply for 2-3 minutes to activate your core’s “piston” mechanism.
- Perform seated cat-cow movements: Gently round and arch your spine for 10 repetitions to mobilize it for daily activities.
- Add seated twists: Holding onto the chair, gently twist to each side, holding for 15-20 seconds to improve rotational mobility.
- Include seated leg lifts: Straighten and lift one leg at a time for 10-15 repetitions per leg to strengthen the hip flexors and quadriceps.
- End with a seated forward fold: Hinge at the hips and let your upper body hang forward to stretch the hamstrings and lower back, holding for 30 seconds.
Pilates for Core or Tai Chi for Balance: Which Suits Your Goals?
Once you’ve embraced movement, the question becomes: which type is best? Both Pilates and Tai Chi are excellent low-impact options for seniors, but they target different aspects of functional fitness. The right choice depends on your primary goal: are you looking to build a stronger, more stable core to support your back and improve posture, or is your main concern improving balance to prevent falls? Understanding their unique approaches helps you apply ‘productive stress’ where you need it most.
Pilates is precision-focused core training. Its primary goal is to strengthen the deep stabilizing muscles of your abdomen, back, and pelvic floor. Think of this as building an internal “girdle” of strength that supports your spine, improves posture, and makes all other movements more efficient and less likely to cause strain. A strong core developed through Pilates can make daily tasks like carrying groceries, getting out of a chair, or reaching for something on a high shelf feel significantly easier and safer.
Tai Chi, on the other hand, is a masterclass in balance and body awareness. It involves slow, flowing, and deliberate movements that challenge your stability in a gentle, continuous manner. This practice trains the connection between your mind and your muscles (proprioception), improving your body’s ability to sense its position in space and react quickly to prevent a fall. As Dr. Suzana Simoes at Miami Jewish Health notes about this gentle practice:
Tai chi involves a series of slow, flowing movements combined with deep breathing. With regular practice, tai-chi confers a number of physical and mental benefits
– Dr. Suzana Simoes, Miami Jewish Health – Joint Effort: Best Exercises for Seniors with Arthritis
So, which is for you? If you struggle with back pain or feel generally unstable, starting with Pilates to build a solid core foundation is a wise choice. If your main fear is falling or you feel unsteady on your feet, Tai Chi will directly address that by fine-tuning your body’s internal balance system. Ultimately, the two are not mutually exclusive; they are complementary tools for building a comprehensively resilient body.
The “Resting Too Much” Trap That Worsens Joint Stiffness
When a joint feels stiff and achy, our first instinct is to immobilize it. We stop moving, hoping that rest will solve the problem. This is one of the most common and counterproductive traps for seniors. While rest is crucial for acute injuries, excessive inactivity is the enemy of joint health. Your joints are designed to move, and this movement is what keeps them healthy through a process we can call ‘active joint lubrication’.
Inside your joints is a substance called synovial fluid. This fluid acts like engine oil, lubricating the cartilage, providing nutrients, and clearing away waste products. Unlike your circulatory system, which has the heart as a pump, the synovial fluid system is passive. It only circulates when you move the joint. When you stay still for too long, the fluid becomes thick and stagnant, the cartilage receives fewer nutrients, and stiffness sets in. Movement is the pump. In fact, research on joint health shows that regular exercise increases synovial fluid production by up to 31%.
The solution isn’t to push through sharp pain, but to break the cycle of stiffness with gentle, frequent motion. The concept of “Movement Snacks” is perfect for this. Instead of one long, daunting workout, you sprinkle short bursts of movement throughout your day. This keeps your joints lubricated, your muscles activated, and prevents the stiffness from settling in. It’s a simple strategy to escape the “resting too much” trap and remind your body that motion is lotion.
Your Joint Lubrication Audit: A 5-Point Movement Snack Plan
- Set the Trigger: Set a timer or use natural cues (like the end of a TV show) to remind you to move every 30-60 minutes.
- Scan Your Body: Where do you feel stiff? Your neck? Ankles? Shoulders? Identify your target areas for the ‘snack’.
- Perform the Movement: Implement a 2-minute routine. This could include 30 seconds of seated marching, 10 ankle circles in each direction, 10 shoulder rolls, and 5 gentle neck rotations.
- Assess the Change: After your movement snack, notice the difference. Is there a little less stiffness? A bit more ease? This positive feedback reinforces the habit.
- Integrate & Escalate: Once the habit is formed, add variety. If you are able to stand, add 5 standing hip circles in each direction to your routine.
When to Push Your Heart Rate for Maximum Cardiovascular Benefit?
Understanding that gentle cardio is beneficial is the first step. The next is knowing how to gauge the intensity for optimal results. Pushing too hard can be risky, while not pushing enough can limit the benefits. The goal is to find the “sweet spot” of productive stress for your heart. This isn’t about hitting a specific number on a monitor, but about learning to listen to your body’s signals. The most reliable and accessible tool for this is the “Talk Test.”
The principle is simple: during your cardio activity, you should be able to hold a conversation, but you shouldn’t have enough breath to sing a song. If you can talk comfortably, you are in the ideal moderate-intensity zone, roughly 60-80% of your maximum heart rate. This is the zone where your heart and lungs are being challenged enough to adapt and grow stronger, without being pushed into a state of excessive stress. Aiming for a level of 4 to 6 on a perceived exertion scale of 1 to 10 (“somewhat hard”) is another excellent way to conceptualize this feeling.
While steady-state cardio is great, incorporating short bursts of slightly higher intensity can further enhance the benefits, particularly for Heart Rate Variability (HRV). HRV is a key marker of your cardiovascular system’s resilience and your body’s ability to handle stress. Research from Bishop et al. found that consistent gentle exercise in this ‘talk test’ zone was superior for improving HRV compared to risky high-intensity bursts in older adults. You can add these “Activity Intervals” simply by walking faster to the next lamppost or finding a gentle incline for 60 seconds before returning to your regular pace. This method of ‘interval training’ is a safe way to add a productive challenge and maximize your cardiovascular gains.
Why Your Breakfast Toast Is Contributing to Sarcopenia?
The title might sound alarmist, but it points to a critical and often overlooked aspect of muscle health in seniors: the quality of your protein and the timing of its intake. Sarcopenia, the age-related loss of muscle mass and strength, is not an inevitable fate but is often accelerated by our dietary habits. Alarming data shows that 30% of adults over 70 struggle with walking or climbing stairs due to this condition. While exercise creates the signal for muscle growth, your diet provides the essential building blocks.
A breakfast of toast, cereal, or a plain bagel is rich in carbohydrates but poor in protein. This type of meal causes a quick spike in blood sugar but does little to combat muscle loss. To build and maintain muscle, your body needs a specific ‘on switch’—an amino acid called leucine. Leucine acts as the primary ‘muscle trigger’, signaling your body to initiate Muscle Protein Synthesis (MPS), the process of repairing and building new muscle tissue. Older adults often experience “anabolic resistance,” meaning they need a higher dose of leucine at a meal to flip this switch compared to younger individuals.
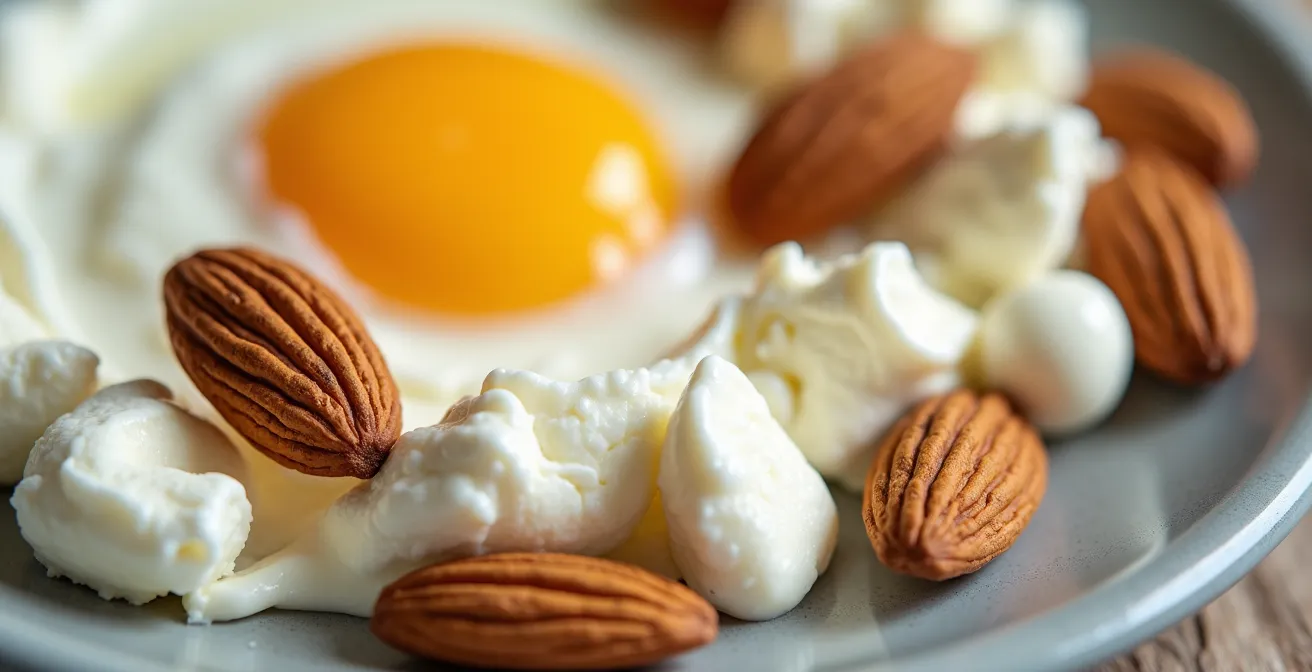
Your breakfast toast simply doesn’t contain enough leucine to hit this crucial threshold. Swapping it out for a protein-rich alternative is one of the most powerful actions you can take to fight sarcopenia. By starting your day with a meal that provides at least 2.5-3 grams of leucine, you are effectively turning on your body’s muscle-building machinery for the hours that follow. Consider these simple, powerful swaps:
- Greek Yogurt Bowl: 1 cup of Greek yogurt (approx. 2.3g leucine) topped with nuts and berries.
- Cottage Cheese Savory Bowl: 1 cup of cottage cheese (approx. 2.6g leucine) mixed with chopped vegetables and herbs.
- Fortified Oatmeal: Your regular oats supercharged with 1 scoop of whey protein isolate (adds approx. 3g leucine).
- Egg White Omelet: An omelet made with 4 egg whites (approx. 2.4g leucine) and filled with spinach and mushrooms.
Why Resistance Bands Are Safer Than Dumbbells for Osteoporosis Patients?
For individuals with osteoporosis, the goal of strengthening muscle to support the skeleton is critical, but the fear of causing a fracture is very real. This makes the choice of equipment paramount. While dumbbells are a classic tool, resistance bands often emerge as a safer and surprisingly effective alternative, especially for this population. The reason lies in the physics of how they apply resistance to the body.
Dumbbells provide a constant force due to gravity. A 5-pound dumbbell weighs 5 pounds at the beginning, middle, and end of a bicep curl. This means the highest stress on the joint and connective tissue occurs at the start of the movement, where you have the least mechanical advantage. This initial high load, combined with the risk of using momentum, can place undue stress on fragile bones. In contrast, resistance bands offer ‘variable ascending resistance’. The resistance is lowest at the beginning of the movement and gradually increases as the band is stretched. This mirrors the body’s natural strength curve, challenging the muscle most where it is strongest (at the end of the range of motion) and being gentler on the joint at the start.
This principle of accommodating resistance makes bands an ideal tool for applying ‘productive stress’ without overloading the skeletal system. The scientific evidence supports this. A recent 2024 meta-analysis revealed that a 12-week resistance band training program improved Bone Mineral Density (BMD) in older adults. Furthermore, a systematic review in 2024 highlighted that band exercises led to significant improvements in functional strength (30-second chair stand), flexibility (sit-and-reach), and mobility and balance (timed up-and-go test) for seniors with osteoporosis, proving their dual benefit of safety and efficacy.
Key Takeaways
- True energy comes from building more ‘cellular engines’ (mitochondria) through gentle cardio, not from passive rest.
- Frequent, short “movement snacks” are more effective for combating joint stiffness than long periods of inactivity.
- Your breakfast is a critical tool: prioritize protein rich in leucine (the ‘muscle trigger’) over simple carbs to fight age-related muscle loss.
How to Build a Cardio Routine That Protects Knees and Hips?
Building a sustainable cardio routine with sensitive joints requires a strategic approach focused on variety, proper form, and gradual progression. The goal is to elevate your heart rate to achieve cardiovascular benefits without subjecting your knees and hips to the repetitive, high-impact stress that can cause pain and inflammation. This means choosing the right activities and structuring your plan intelligently.
As Dr. Khalid Yousuf, MD, of Baylor Scott & White Medical Center states, “Swimming provides excellent cardiovascular exercise while the water’s buoyancy reduces joint stress. Yoga combines gentle stretching with strength building, improving both flexibility and stability.” These activities, along with the use of a recumbent bike or an elliptical machine, form the foundation of a joint-friendly cardio program. The key is to rotate between different modalities. This variety not only prevents boredom but, more importantly, prevents overuse injuries by not stressing the same joints in the exact same way day after day.
A successful plan also incorporates a structured progression. You don’t go from zero to sixty. You start with short durations and gradually increase your time and intensity as your body adapts. An excellent, often overlooked technique is retro-walking (walking backward), which engages different muscles and places less stress on the knee joint. This can be a fantastic way to warm up or build an initial base. The following is a sample progression plan that prioritizes joint safety:
- Weeks 1-2: Start with 5-minute sessions of retro-walking, holding onto a railing for support. Focus on form and control.
- Weeks 3-4: Progress to 15-minute “Gait Re-education Walks” (forward walking), focusing consciously on landing softly and rolling through your foot.
- Weeks 5-6: Incorporate the recumbent bike. Ensure the seat is adjusted so your knee maintains a 25-35 degree bend at the fullest extension to protect the joint.
- Weeks 7-8: If you have access to a pool, try aqua jogging. The water provides resistance for a great workout with virtually zero impact.
- Ongoing: Rotate between your chosen modalities (e.g., walking Monday, swimming Wednesday, bike Friday) to ensure your joints stay happy and your body stays challenged.
This methodical approach ensures you are consistently applying a productive stimulus for your heart, while giving your joints the respect and protection they need to carry you forward for years to come.
Frequently Asked Questions on Senior Fitness
What’s the safest way to gauge exercise intensity without technology?
Use the Talk Test: If you can talk but not sing, you’re in the optimal zone (60-80% max heart rate). This simple, reliable method ensures you’re challenging your cardiovascular system enough to see benefits without pushing into a risky zone. It prioritizes listening to your body over focusing on a number.
How should I add intensity intervals to my walks?
Incorporate 60-second ‘Activity Intervals’. Instead of complex timing, use visual cues. Walk faster to the next lamppost, find a gentle incline to climb, or simply pick up your pace for one minute before returning to your normal speed. This makes adding intensity intuitive and safe.
What perceived exertion level should I aim for?
Aim for a 4 to 6 on a 1-to-10 scale, where 1 is sitting in a chair and 10 is your absolute maximum effort. A level of 4-6 feels ‘somewhat hard’—you notice your breathing and heart rate are up, but you feel in control and could maintain the pace. Always prioritize this feeling over what any device tells you.