

In summary:
- Focus on the rollator and car as a single “mobility system,” not just isolated products.
- Prioritize side-folding rollators for a compact, standable package that fits most trunks.
- Master the “slide, pivot, and push” technique to load your rollator without risking back injury.
- Understand that the right rollator doesn’t just fit in your car; it gives you the energy and confidence to go further.
For active seniors, a rollator isn’t a sign of slowing down; it’s a tool for staying engaged, independent, and connected. Yet, a common frustration can quickly put the brakes on freedom: the struggle to fit the rollator into a car trunk. Many people focus on the most obvious advice—measure your trunk and find a lightweight model. While not wrong, this approach misses the bigger picture and often leads to disappointment and even physical strain.
The real challenge isn’t just about dimensions. It’s about the entire experience: the energy it takes to lift the device, the way it handles on different surfaces once you arrive, and the confidence you feel using it. The disconnect between a great rollator and a practical car transport solution can mean the difference between a spontaneous trip to the park and staying home.
But what if the key wasn’t finding the smallest or lightest rollator, but rather selecting a complete mobility system? This guide reframes the problem. We’ll move beyond simple measurements to explore how a rollator’s design, folding mechanism, and even the way you lift it are all interconnected parts of keeping you active. We’ll show you how to choose a device that works in harmony with your vehicle, protecting your back and preserving your energy for the adventures that await.
This article will walk you through the crucial factors that make a rollator car-friendly, from the science behind walking further to the practical techniques for safe lifting. Explore the sections below to build the confidence needed to make the right choice.
Summary: How to Choose a Rollator That Fits in Your Car Trunk?
- Why Using a Rollator Allows You to Walk 50% Further?
- How to Use Rollator Brakes Correctly When Sitting Down?
- Three-Wheel Turners or Four-Wheel Stabilizers: Which Is Best for Indoors?
- The Trunk Lift Mistake That Causes Back Spasms
- What to Carry in Your Walker Basket to Stay Independent?
- Stationary Bike or Walking: Which Is Better for Arthritic Knees?
- Why Staying Visible in Your Community Matters for Mental Health?
- How to Plan an Accessible Road Trip With a Wheelchair?
Why Using a Rollator Allows You to Walk 50% Further?
The primary benefit of a rollator is intuitive: it provides support and a place to rest. But the science behind it reveals a much deeper impact on your endurance. A rollator doesn’t just help you balance; it fundamentally changes the way you walk, making each step more efficient and less taxing on your body. This allows you to conserve energy and, as a result, venture further than you could without one.
The key lies in biomechanics. When you walk, your knees absorb a significant amount of force. For those with arthritis or muscle weakness, this can cause pain and fatigue. A rollator allows you to offload some of your body weight through your arms, reducing the strain on your lower joints. In fact, biomechanical research demonstrates that using a rollator can lead to up to a 50% reduction in knee extensor moment, meaning your muscles don’t have to work as hard to stabilize your knee. This saved energy directly translates into greater walking distance.
Furthermore, the smooth, rolling assistance promotes a more natural and rhythmic gait. This can improve both speed and distance. For instance, studies on rolling cane users with hemiparesis showed a 50% increase in walking speed and a 49% increase in distance. By making movement more fluid and less strenuous, your rollator gives you back the capacity for longer, more enjoyable outings, turning a short, tiring walk into a comfortable stroll. This energy return is the true foundation of renewed independence.
How to Use Rollator Brakes Correctly When Sitting Down?
A rollator’s seat offers a welcome opportunity for rest, but its safety hinges entirely on one critical action: properly engaging the parking brakes. Failing to do so can lead to the rollator slipping away as you sit, creating a serious fall risk. It’s a simple process, but one that requires mindful execution every single time. The goal is to transform your rollator from a mobile device into a stable, stationary chair.
Before even thinking about sitting, you must ensure the rollator is “parked.” This involves pushing down on both brake levers until you hear or feel a distinct “click.” This click is your confirmation that the parking brake mechanism is engaged, locking the wheels in place. Merely squeezing the brakes, which are designed for slowing down while walking, is not enough. You must actively push the levers into the locked position.
Proper body mechanics are also crucial for safety. Once the brakes are locked and tested, you should turn around and back up until the back of your legs touch the edge of the seat. Keep your hands on the handles for support as you lower yourself. This process is often where mistakes happen, as clinical studies show that approximately 50% of rollator users don’t position their feet correctly during this maneuver. By ensuring the device is fully locked and positioned correctly, you can sit with confidence anywhere you go.
Your Action Plan: The Complete Parking Brake Engagement Checklist
- Position on Level Ground: Always place the rollator on a flat, stable surface before attempting to sit.
- Engage Parking Brakes: Push both brake handles DOWN firmly until you hear or feel a distinct ‘click’. This is the lock.
- Test the Lock: Gently try to push the rollator forward. It should not move. Do this before putting any weight on the seat.
- Maintain Contact: Keep your hands on the handles for additional stability as you lower yourself onto the seat.
- Release to Go: To release the parking brake after standing up, pull UP on both brake handles simultaneously.
Three-Wheel Turners or Four-Wheel Stabilizers: Which Is Best for Indoors?
When choosing a rollator, one of the first decisions is between a three-wheel and a four-wheel model. While both offer support, their designs create significant differences in maneuverability, stability, and even how they fit in a car trunk. The best choice often depends on your primary environment. For navigating the tight corners of a home, a three-wheel model, often called a “turner,” has a distinct advantage.
The key difference is the turning radius. A three-wheel rollator, with its single front wheel, can pivot in much tighter spaces, making it ideal for narrow hallways, small bathrooms, and cluttered rooms. However, this agility comes at a cost: stability. With only three points of contact, they are less stable than their four-wheel counterparts and, crucially, do not offer a seat. This makes them purely a walking aid for indoor mobility.
Four-wheel rollators provide a much more stable base of support and include an integrated seat, which is essential for users who need to rest. While their wider turning radius can make them slightly more cumbersome indoors, they excel in providing a secure platform. This trade-off is also reflected in their “ergonomic footprint” when folded for car transport. A three-wheeler folds flat but remains wide, while modern four-wheelers often use a side-fold mechanism to become a narrow, tall package that can stand on its own—a feature many find easier to manage when loading into a vehicle.
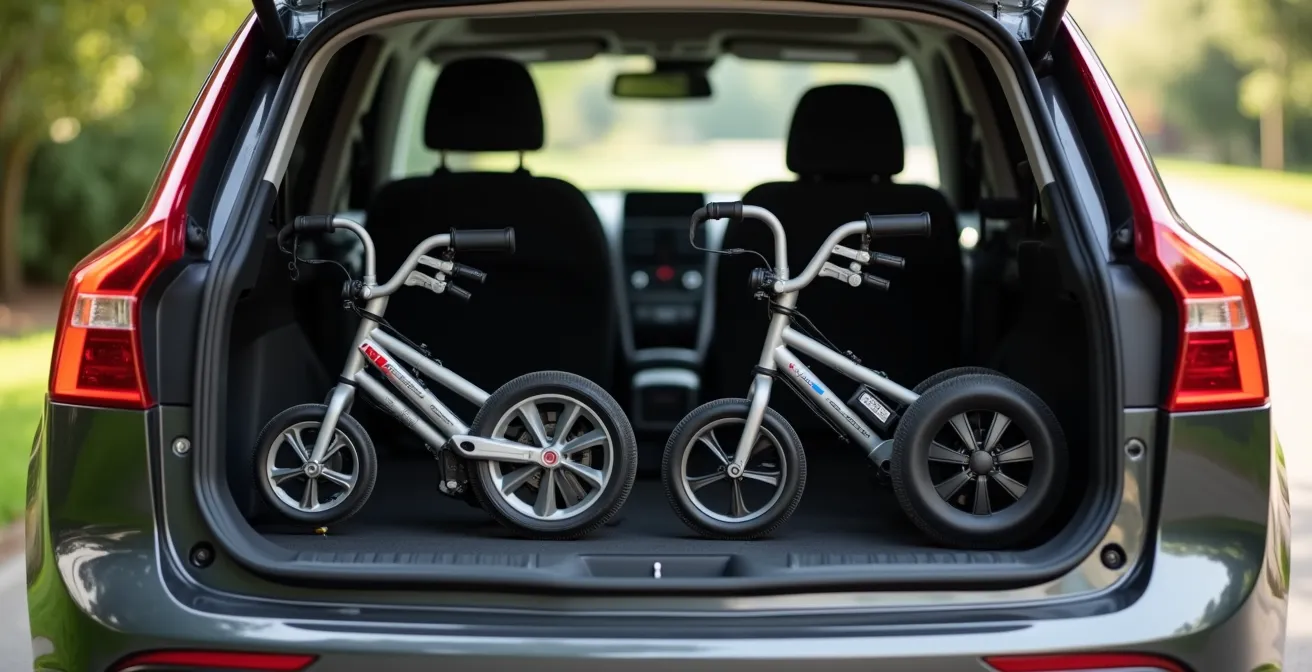
As the image above illustrates, the folded shape is just as important as the folded size. The tall, narrow profile of a side-folding four-wheel rollator can often fit more easily into a car trunk or back seat than the wide, flat profile of a three-wheel model. The following comparison, based on an analysis of different rollator types, highlights these key differences.
| Feature | 3-Wheel Rollator | 4-Wheel Rollator |
|---|---|---|
| Turning Radius | Tighter – excellent for narrow hallways | Wider – needs more space to turn |
| Trunk Fit | Folds flatter but wider | Side-fold creates narrow, standable package |
| Weight | 11-14 lbs typically | 15-18 lbs typically |
| Seat Stability | No seat available | Stable seat with backrest |
| Indoor Maneuverability | Superior in tight spaces | Good but requires wider doorways |
| Storage Basket | Small front basket only | Larger under-seat storage |
The Trunk Lift Mistake That Causes Back Spasms
One of the most significant barriers to using a rollator for outings is the physical act of lifting it into a car. Many users, and even caregivers, attempt to hoist the device in one motion, bending at the waist and straining their back. This single mistake is a common cause of back spasms and can create a fear of travel. The solution isn’t necessarily a lighter rollator, but a smarter technique that uses leverage instead of brute force.
The secret is to let the car do most of the work. Instead of lifting the entire weight of the rollator, your goal should be to simply guide it into place. This “slide, pivot, and push” method transforms the task. By first placing the front wheels on the edge of the trunk or back seat, you immediately transfer most of the device’s weight to the vehicle. From there, it’s a matter of gentle guidance, not heavy lifting. This technique of lifting leverage is a game-changer for preserving your back health.
Weight is still a factor, but understanding the range is key. According to industry data, rollator weights typically range from 13-15 lbs for lightweight models vs 16-19 lbs standard. While a 5-pound difference seems small, it can be significant. However, even a heavier rollator becomes manageable with the right technique. By focusing on leverage, you can confidently handle a robust, stable rollator without fear of injury.
To safely load your rollator, follow these ergonomic steps:
- Position and Support: Place the rollator’s front wheels onto the edge of the trunk or seat. Let the car take the weight.
- Adopt a Wide Stance: Stand with your feet shoulder-width apart to create a stable base for yourself.
- Slide and Tip: Gently tip the rollator and slide it in, using the car’s surface as a ramp. Often, you can hold it in place with just one finger.
- Use Gravity: For SUVs and hatchbacks with a low frame, you may be able to simply roll the walker directly in.
- Lock the Wheels: Before lifting or sliding, always lock the rollator’s wheels to prevent it from rolling unexpectedly.
What to Carry in Your Walker Basket to Stay Independent?
The basket or storage bag on your rollator is more than just a convenience; it’s a crucial component of your independence. When you travel by car, what you carry in it can make the difference between a smooth, enjoyable outing and a frustrating one. Thinking of its contents as a “transition kit” helps you prepare for the specific challenges of moving from your car to your destination and back.
The goal is to equip yourself for small, predictable problems. For instance, dropping car keys in a parking lot can be a major issue if bending over is difficult. A compact, foldable grabber tool stored in your basket instantly solves this. Likewise, a thin seat cushion can dramatically improve the comfort of the rollator’s built-in seat for longer rests, and a dedicated water bottle holder frees up basket space for essentials like a wallet, phone, and a small snack. These items form a practical support ecosystem right at your fingertips.
Visibility and security are also paramount. Applying reflective tape to the rollator frame makes you more visible in dim parking garages, while a cargo net stretched over the basket prevents contents from spilling during transport or when lifting the device into the trunk. These small additions create a large impact on safety and convenience.
For some, even with an empty basket, trunk space is the limiting factor. This is where creative external transport solutions can be invaluable.
Case Study: External Rollator Carrier Solutions
A couple who both used rollators found that their 2014 Kia Soul’s trunk was inadequate for carrying both devices. They successfully adapted a trunk-mounted bicycle rack to carry their folded rollators on the outside of the vehicle. An alternative they explored was installing a trailer hitch with a small cargo carrier, securing the rollators with ratchet straps. This case study demonstrates that when internal space is a barrier, external solutions can restore the ability to travel. It also highlights a key safety point: overloaded baskets create a dangerous imbalance, making the rollator much harder and more hazardous to lift.
Stationary Bike or Walking: Which Is Better for Arthritic Knees?
Maintaining the physical strength to use and transport your rollator is just as important as choosing the right model. For individuals with arthritic knees, this presents a paradox: you need to exercise to stay strong, but many exercises can cause pain. This section explores two low-impact options, walking with a rollator and using a stationary bike, and how they can work together to support your mobility.
Walking with a rollator is an excellent weight-bearing exercise that is gentle on the joints. As discussed earlier, the rollator offloads a significant portion of your body weight, reducing stress on your knees while still allowing you to build endurance and maintain bone density. It’s a functional exercise that directly translates to real-world activity.
A stationary bike, on the other hand, is a non-weight-bearing exercise. It allows you to strengthen key leg muscles and improve cardiovascular health with virtually no impact on your knee joints. This is particularly beneficial on days when your knees are too sore for walking or when the weather is poor. More importantly, the specific muscles strengthened by cycling are crucial for rollator users.
Case Study: A Complementary Training Approach
A systematic review of multiple studies found that rollator users who combined walking with stationary bike training showed significant improvements in their gait quality. The cycling specifically strengthened the quadriceps, the large muscles at the front of the thigh. These muscles are essential for the sit-to-stand motion, making it easier and safer to get up from the rollator’s seat. By maintaining fitness levels with the bike on bad-weather days, users were more confident and capable during their outdoor rollator excursions when conditions improved. This demonstrates that the two activities aren’t mutually exclusive; they are a powerful combination for maintaining independence.
Key takeaways
- Your rollator’s “ergonomic footprint”—its shape when folded—is more important than its raw dimensions for fitting into a car.
- Using the car as leverage to slide, not lift, your rollator is the most effective way to prevent back strain.
- A rollator is a tool for energy conservation; it reduces the load on your joints, allowing you to walk further with less fatigue.
Why Staying Visible in Your Community Matters for Mental Health?
The ultimate purpose of finding a rollator that fits in your car is to get out and participate in life. Staying connected to your community—whether it’s visiting a library, meeting friends for coffee, or browsing a local market—is profoundly important for mental health. It combats isolation and reinforces a sense of purpose and belonging. Your rollator is your key to this connection, and how you feel about your rollator can directly impact your willingness to use it.
Many standard-issue rollators have a sterile, medical appearance that can make users feel self-conscious. This is where personalization becomes a powerful tool. By adding elements that reflect your personality, you transform the device from a medical necessity into a personal accessory. This can be as simple as choosing a model in a favorite color like red or blue, adding stylish seat cushions, or applying decorative, weather-resistant decals. These small touches make the rollator feel like an extension of yourself, not an emblem of a condition.
Beyond aesthetics, increasing your rollator’s visibility also enhances safety. Parking lots and street crossings can be hazardous, especially at dusk. Applying high-quality SOLAS-grade reflective tape to the frame and adding rechargeable LED clip-on lights make you significantly more visible to drivers. This practical step provides peace of mind and builds the confidence needed to venture out, especially in the evening. A distinctive ribbon or flag can also make it easier to spot your rollator in a crowded place.

When you feel good about your rollator and confident in your safety, you are far more likely to use it. It becomes a bridge to social interaction, not a barrier. Embracing your rollator as a personalized and visible part of your life is a declaration of your intent to remain active and engaged in the world around you.
How to Plan an Accessible Road Trip With a Wheelchair?
While this section’s title mentions a wheelchair, the planning principles are perfectly adaptable and essential for any road trip involving a rollator. A successful multi-day trip with a mobility aid isn’t just about getting it in the car; it’s about smart planning that maximizes space, minimizes physical strain, and ensures you’re prepared for the road ahead. This turns a potentially stressful journey into a comfortable adventure.
The first step is rethinking how you pack. Hard-sided suitcases are rigid and inefficient. Switching to soft duffel bags allows you to pack clothes and other items into the empty spaces around your folded rollator in the trunk, making the most of every square inch. Before you even pack, it’s wise to use Google Maps Street View to scout your destinations. Look for potential obstacles like cobblestones, high curbs, or single steps at entrances that could be challenging with a rollator.
On the road, plan to stop every 60 to 90 minutes. These breaks aren’t just for rest; they’re an opportunity to get out, unfold your rollator, and take a short walk to prevent stiffness and fatigue. It’s also wise to pack a small maintenance kit for your rollator, including an Allen wrench for tightening loose bolts and any tools needed for brake adjustments. For some, creative packing is the key to a successful trip.
Case Study: Multi-Day Road Trip Trunk Organization Strategy
A family on a week-long road trip to Nova Scotia developed a brilliant system for their rollator. For trunk organization, they positioned the folded rollator vertically between the taillights, using the trunk’s built-in tie-down hooks to secure it. This freed up the majority of the cargo area for luggage. They also discovered that local bike shops were an excellent resource for on-the-road brake adjustments, as rollator brake systems are very similar to those on bicycles. This highlights the importance of creative problem-solving when on the move.
By viewing your rollator and car as an integrated mobility system and adopting smarter techniques for transport and use, you can unlock a new level of freedom. The right choice is the one that not only fits in your trunk, but also fits your life. To put these ideas into practice, the next logical step is to assess the available models with this new perspective in mind.