
In summary:
- Even a 1/4-inch threshold is a significant fall risk for those with a shuffling gait or who use mobility aids.
- Replacing raised transitions with zero-profile strips or beveled rubber ramps creates a seamless, trip-free surface.
- High-contrast flooring between rooms helps prevent falls by making depth changes clearly visible.
- Properly arranging furniture and selecting the right indoor footwear are as crucial as fixing the floor itself.
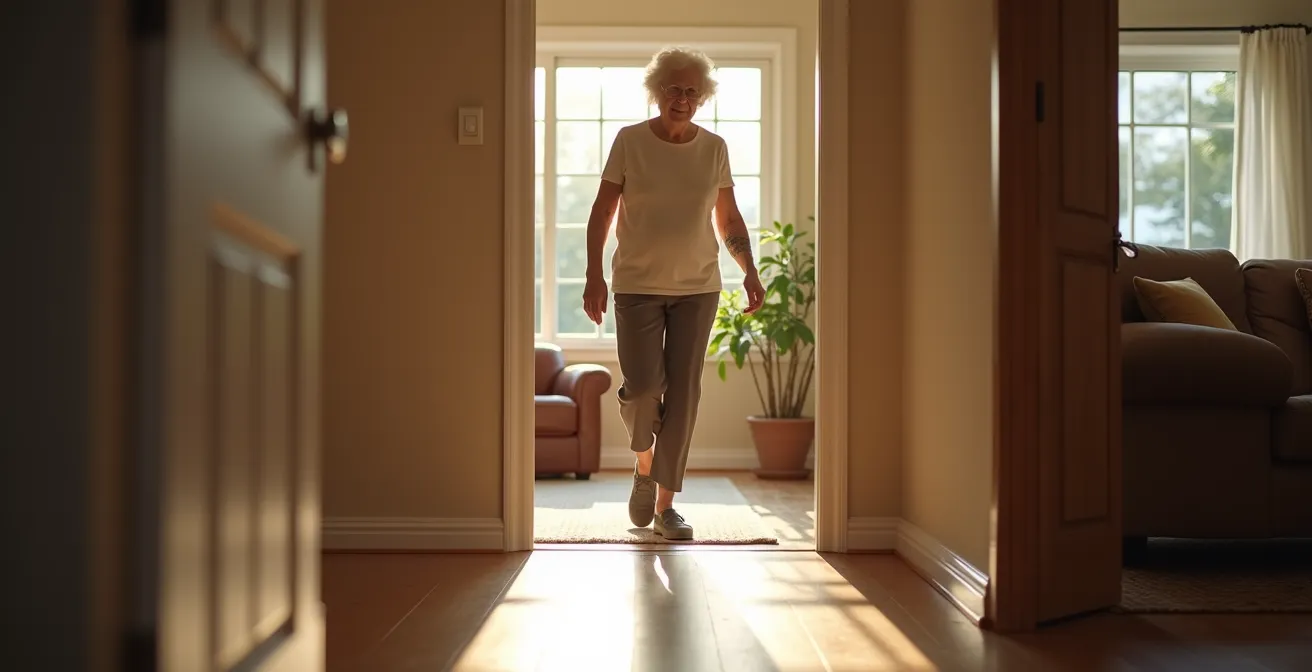
That small jolt as your toe or a walker wheel catches on a seemingly insignificant floor transition is more than an annoyance; it’s a warning sign. For many seniors, especially those with a shuffling gait, this tiny bump is a primary catalyst for a life-altering fall. The common advice is often to “be careful” or “clear clutter,” but this overlooks the fundamental engineering flaw present in many homes: micro-obstacles built into the very floors we walk on.
True home safety isn’t about just being more alert. It requires a specialist’s eye to identify and re-engineer these subtle environmental hazards. It’s about understanding the mechanics of how a shuffling foot interacts with a floor and how a rollator wheel behaves at a transition. The conventional wisdom addresses the most obvious dangers, but often fails to tackle the persistent, low-profile risks that cause the most frequent trips.
But what if the key wasn’t just removing rugs, but fundamentally rethinking the path from one room to the next? This guide moves beyond simple tips. We will dissect the specific risks posed by common flooring transitions and provide detailed, structural solutions. We will explore how to create truly frictionless pathways, analyze the role of visual perception in navigation, and detail how the right furniture arrangement and footwear complete a comprehensive fall prevention strategy.
This article provides a detailed roadmap for identifying and eliminating these hidden dangers. By following the structured advice within, you can transform your home from a collection of potential hazards into a seamlessly safe environment.
Contents: How to Eliminate Threshold Trips Between Rooms for Safer Walking?
- Why a 1/4 Inch Threshold Is a Major Fall Hazard for Shuffling Gaits?
- How to Install Rubber Ramps for Smooth Room-to-Room Transitions?
- Flush Transition Strips or T-Moldings: Which Is Safer for Rollators?
- The Monochromatic Floor Mistake That Hides Depth Changes
- How to Arrange Living Room Furniture to Create a Barrier-Free Walkway?
- The “Shuffling Walk” Habit That Increases Slip Risk
- Why a Slip on a Throw Rug Is the #1 Cause of Senior Hospitalization?
- How to Choose Indoor Footwear That Prevents Slipping on Hardwood?
Why a 1/4 Inch Threshold Is a Major Fall Hazard for Shuffling Gaits?
To someone with a healthy, high-stepping gait, a quarter-inch threshold is almost unnoticeable. However, for an individual with a shuffling gait—a common characteristic in older adults due to reduced muscle strength or neurological conditions—this tiny vertical rise becomes a significant barrier. A shuffling walk has minimal vertical lift; the foot barely clears the floor. Consequently, a 1/4-inch edge is more than enough to catch the toe, leading to a sudden stop in momentum and a high-risk forward fall. The scale of this problem is immense, with falls resulting in death rates of 78.0 per 100,000 older adults in 2021, making environmental hazards a critical focus.
The danger is compounded for users of walkers and rollators. The small front wheels can easily get stuck on such an edge, abruptly halting the device while the user’s body continues to move forward. This creates a powerful tipping force. From a specialist’s perspective, any vertical transition that is not beveled at a low angle is a “micro-obstacle.” It’s a planned hazard. Studies confirm the danger, showing that environmental factors like uneven surfaces account for 30% to 50% of falls among older adults. A quarter-inch threshold is a prime example of such an uneven surface, hidden in plain sight.
Understanding this root cause—the interaction between a specific gait and a specific floor flaw—is the first step in engineering a truly safe home environment.
How to Install Rubber Ramps for Smooth Room-to-Room Transitions?
When a threshold cannot be removed entirely, a beveled rubber ramp is the superior solution for creating a safe, frictionless transition. Unlike hard, steep transition strips, a rubber ramp provides a gradual, anti-slip incline that is easily navigable by feet, walkers, and wheelchairs. The key is selecting a ramp with the correct slope and ensuring a secure installation. A 1:12 slope ratio (one inch of rise for every twelve inches of length) is a common accessibility standard, but for very low thresholds, pre-made ramps offer an even gentler gradient.
The installation process is critical for safety. The goal is to create a seamless, immovable surface. First, thoroughly clean the floor on both sides of the threshold to ensure maximum adhesion. Most quality rubber ramps come with a high-strength adhesive backing. After measuring the doorway width and cutting the ramp to size with a utility knife, you perform a dry fit to ensure it sits flush against the threshold and the floor. Once you confirm the fit, you peel the backing and press the ramp firmly into place, applying even pressure across its entire surface. For concrete or uneven subfloors, an additional application of construction-grade adhesive may be required.
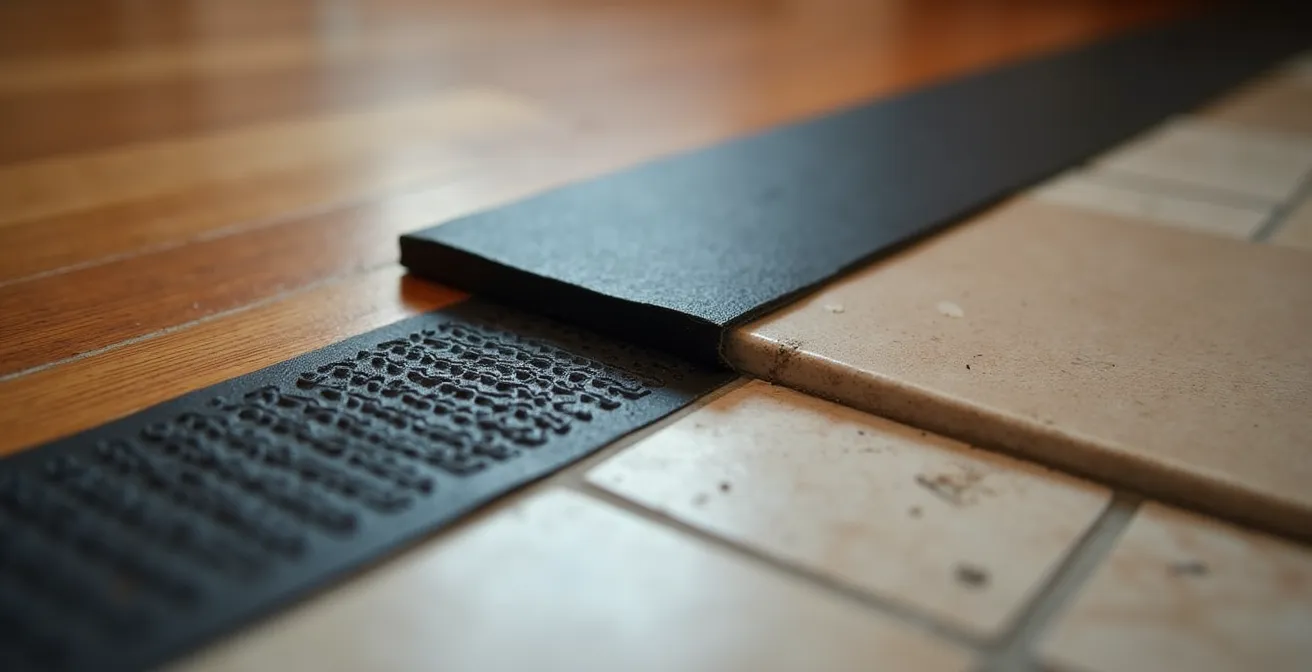
As this detailed view shows, a correctly installed ramp creates a continuous surface. There should be absolutely no gap between the ramp’s edge and the adjoining floor, as even a small lift could create a new snag point. The beveled edges of the ramp should blend smoothly into the floor, eliminating the very vertical hazard you aim to correct. After installation, walk over it and roll a mobility aid across it multiple times to confirm it is completely stable and does not shift.
This small project can have an outsized impact, effectively erasing one of the most common trip hazards in a home.
Flush Transition Strips or T-Moldings: Which Is Safer for Rollators?
When transitioning between two hard flooring surfaces of the same height (like tile to wood), homeowners are often presented with two options: a T-molding or a flush transition strip. While a T-molding is easier to install, it is a significant hazard for rollator and walker users. Its design features a raised central “T” section that sits over the seam, creating a new bump in the middle of the doorway. A rollator’s wheels can easily catch on either side of this raised section, leading to instability and a high risk of tipping.
A flush transition strip, by contrast, is designed to be level with the floor, creating a completely flat and continuous surface. While installation is more complex—requiring a precise gap between the two flooring materials for the strip to lock into—the safety payoff is immense. For anyone using a mobility aid, the choice is clear: a flush transition is always the safer option. It eliminates the micro-obstacle that a T-molding introduces, creating the truly seamless path necessary for safe navigation.
This table, based on an analysis of environmental fall factors, breaks down the critical differences for anyone prioritizing mobility safety.
| Feature | Flush Transition Strips | T-Moldings |
|---|---|---|
| Rollator Safety | Excellent – no raised center | Poor – wheels can catch on raised T |
| Installation | More complex | Simpler |
| Profile Height | Minimal to none | Raised center profile |
| Best For | Wheelchair/rollator users | Standard foot traffic only |
Opting for a flush transition over a T-molding is a deliberate choice to engineer safety directly into the floor, rather than leaving a known hazard in place for convenience.
The Monochromatic Floor Mistake That Hides Depth Changes
A fall hazard isn’t always physical; sometimes, it’s perceptual. A common interior design choice that inadvertently creates risk is the use of monochromatic or similarly colored flooring between rooms with different heights. When a light beige carpet meets a light wood floor at a threshold, the lack of color contrast can make the change in depth nearly invisible, especially for individuals with age-related vision changes like reduced contrast sensitivity.
This creates what specialists call a visual-proprioceptive disconnect. The eyes send a signal to the brain that the path ahead is flat and continuous. However, the body’s internal sense of position (proprioception) is then violently surprised when the foot encounters an unexpected step-down or step-up. This sensory conflict can easily lead to a loss of balance and a fall. Even with adequate lighting, the lack of a distinct visual edge camouflages the danger. The brain simply doesn’t register the change in elevation in time to adjust the gait.
The solution is to ensure a clear, high-contrast visual cue at every transition point. This doesn’t require jarring color choices. A dark-colored threshold strip between two light floors, a dark wood floor adjoining a light tile, or even a beveled rubber ramp in a contrasting color (like black or grey) can provide the necessary signal. This visual border tells the brain, “Attention: the surface is changing.” This allows the gait to be adjusted preemptively, lifting the foot slightly higher or preparing for a small step down, effectively neutralizing the hazard before it’s physically encountered.
Prioritizing visual contrast at transitions is just as important as ensuring the physical surface is smooth.
How to Arrange Living Room Furniture to Create a Barrier-Free Walkway?
A safe floor is only part of the equation; the arrangement of objects on that floor determines the true navigability of a space. A living room filled with poorly placed furniture can create a dangerous obstacle course. The goal is to create an “engineered walkway”—a clear, wide, and predictable path connecting key points of the room, such as the entrance, the primary seating area, and the exit to the next room. This path should be free of any and all obstructions.
This walkway should be at least 36 inches wide to comfortably accommodate a walker or rollator without risk of snagging on furniture legs or corners. This often means rethinking traditional living room layouts. Low coffee tables, ottomans, and floor plants should be moved out of the main traffic corridor. Furniture should be arranged along the walls to maximize the central open space. Electrical and charger cords must be routed away from this path, secured along baseboards or walls to eliminate them as a primary trip hazard. Sofas and chairs should also be of an appropriate height to allow for easy sitting and standing without strain, which contributes to overall stability.
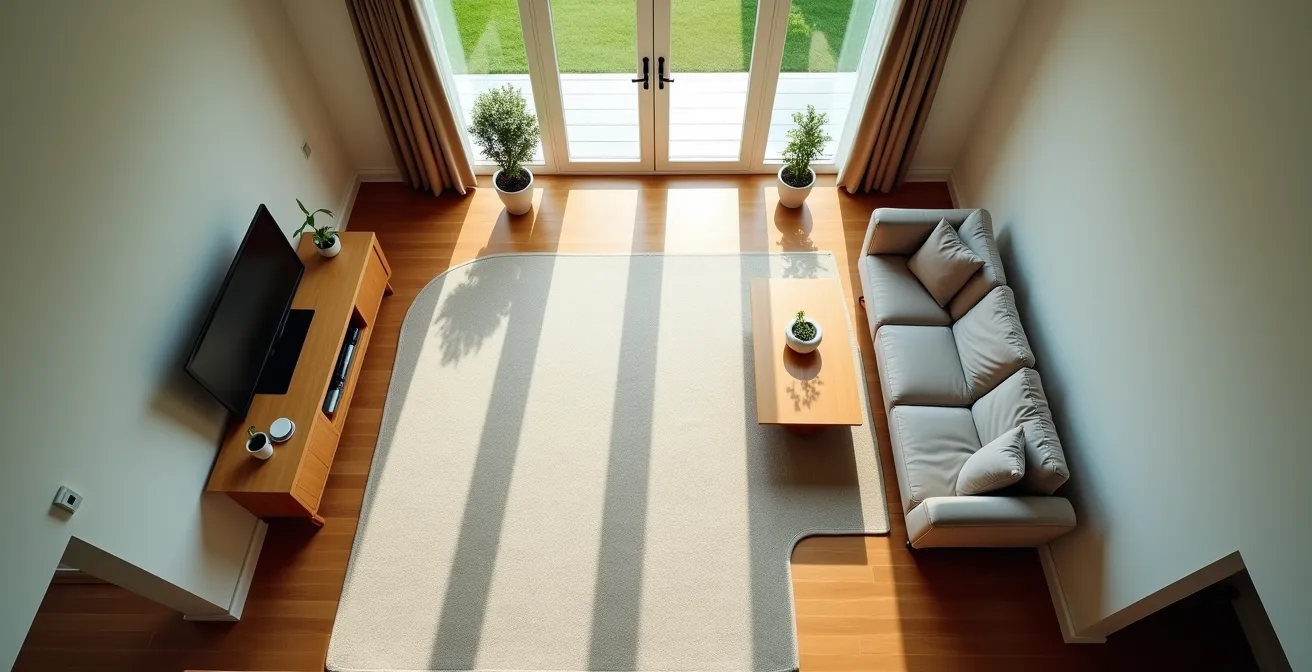
As seen from above, an ideal layout creates a “river” of open space. The path is unambiguous and direct. There are no sudden turns or low-profile objects to navigate around. This intentional design removes the cognitive load of route-planning and allows for a smooth, uninterrupted walking pattern, which is especially important for those with gait or balance issues. To implement this, you need a clear plan.
Action Plan: Auditing Your Walkway for Hazards
- Identify your main path: Trace the most common route you take through the room (e.g., from the door to your favorite chair).
- Measure the width: Use a tape measure to ensure the path is at least 36 inches wide at all points.
- Remove low-level objects: Relocate any furniture or decor lower than knee-height from the pathway (coffee tables, footstools, planters).
- Secure all cords: Check for any electrical, phone, or charger cords crossing the path and secure them flush against the wall or under a rug that is fully taped down.
- Check for furniture creep: Ensure that chairs or tables haven’t slowly shifted into the designated walkway over time.
By actively designing your walkways instead of letting them form by accident, you transform a room from a potential hazard zone into a safe, accessible space.
The ‘Shuffling Walk’ Habit That Increases Slip Risk
While environmental factors are a major part of fall risk, gait mechanics play an equally critical role. The “shuffling walk,” characterized by short strides where the feet barely leave the ground, is a significant risk factor in itself. This gait pattern means there is almost zero clearance between the sole of the shoe and the floor. This dramatically increases the likelihood of catching a toe on any minor imperfection—a slightly curled rug edge, a floorboard, or a small threshold. It’s a walking habit that essentially scans the floor for things to trip on.
Furthermore, a shuffling gait often involves a flat-footed landing rather than a normal heel-to-toe roll. This increases the total surface area of the sole in contact with the floor at all times, which can ironically increase the risk of a slip on a smooth or slick surface like polished hardwood or tile. Instead of the dynamic weight shift that helps maintain balance, the entire foot is prone to sliding out from under the body’s center of gravity. Research shows that 44% of older adults at risk for falls have gait and balance problems, highlighting this as a core issue.
While modifying a long-standing gait pattern is challenging, it is not impossible. Physical therapy and targeted exercises can help improve strength and balance. Simple exercises focused on leg lifts, ankle flexibility, and core stability can gradually increase foot clearance and promote a more stable, heel-to-toe walking motion. As noted by physical therapists, regularly performing fall-prevention exercises specifically strengthens the key muscles and joints needed to improve balance and reduce fall risk. Correcting the environment is the first priority, but addressing the user’s gait mechanics is a crucial second step for comprehensive safety.
A safe home accounts for both the floor’s condition and the way a person walks upon it.
Why a Slip on a Throw Rug Is the #1 Cause of Senior Hospitalization?
While the title is a slight exaggeration, the sentiment is deadly serious: throw rugs are one of the most hazardous items in a senior’s home. They are implicated in a massive number of falls, many of which lead to severe injury and hospitalization. The danger is twofold. First, the rug itself can slide on a smooth surface like hardwood or tile, acting like a skateboard underfoot. Second, and just as common, the edge of the rug can curl or bunch up, creating the exact type of low-profile micro-obstacle that a shuffling gait is certain to find. The result is a trip and fall with devastating consequences; CDC statistics show that about 37% of falls result in an injury requiring medical treatment or restricted activity for at least a day.
From a safety specialist’s viewpoint, a loose throw rug is an unacceptable risk. It introduces instability into an otherwise stable environment. Many people use them in high-traffic areas like hallways, kitchens, and bathrooms, precisely the places where a slip is most likely to occur. The perceived benefit of comfort or decoration is vastly outweighed by the risk of a broken hip, head injury, or other major trauma.
The only truly safe throw rug is one that has been completely immobilized. If you must keep a rug, it needs to be secured on all four sides with heavy-duty, double-sided carpet tape, ensuring its edges are absolutely flat and flush with the floor. A better alternative is to choose rugs with a high-quality, built-in, non-slip rubber backing that grips the floor firmly. However, the most definitive solution is always to remove them entirely, especially from main walkways. Replacing them with a large, wall-to-wall area rug or simply leaving the hard flooring bare is always the safer choice.
Eliminating this one common household item can drastically reduce the overall risk of a serious fall.
Key Takeaways
- Any floor transition with a vertical edge, no matter how small, must be replaced with a zero-profile strip or a beveled ramp.
- Use high-contrast colors at flooring transitions to provide a clear visual warning of changes in elevation.
- The safest indoor footwear features a closed heel, a snug fit, and a wide, soft rubber sole for maximum grip and stability.
How to Choose Indoor Footwear That Prevents Slipping on Hardwood?
The final point of contact between a person and the floor is their footwear, and it can be the difference between a secure step and a dangerous slip. On smooth surfaces like hardwood, vinyl, or tile, the material and design of the sole are paramount. Traditional socks or soft-soled, fuzzy slippers offer almost no grip and are extremely hazardous. The ideal indoor shoe must be chosen with the same seriousness as an outdoor walking shoe, prioritizing stability and traction over comfort alone.
The most important feature is a sole made of soft rubber or crepe. These materials offer excellent friction against smooth floors, preventing the foot from sliding. Conversely, soles made of smooth leather or felt provide poor traction and should be avoided. The shoe itself should provide full coverage and support. As experts from the Caring Senior Service emphasize, a closed, structured heel is non-negotiable.
Shoes with a closed, structured heel provide critical stability and prevent the foot from sliding out, while adjustable straps ensure a snug fit as feet swell or shrink
– Senior Care Specialists, Caring Senior Service Guide 2026
This structure prevents the foot from slipping out sideways or backwards, a common issue with backless slippers or clogs. An adjustable closure, like Velcro straps, allows for a customized, snug fit throughout the day. This combination of a grippy sole and a secure upper creates a stable base that can help compensate for minor balance issues or uneven surfaces.
This table clearly outlines which materials provide the best grip for indoor hard surfaces.
| Sole Material | Grip on Hardwood | Recommended |
|---|---|---|
| Soft Rubber | Excellent | Yes |
| Crepe | Good | Yes |
| Smooth Leather | Poor | No |
| Felt | Poor | No |
By combining a re-engineered, hazard-free floor with properly selected footwear, you create a comprehensive safety system that addresses fall prevention from the ground up.