
Securing an area rug is more than just stopping it from sliding. Most common advice fails because it ignores the crucial interaction between materials. True safety for seniors on hardwood or tile floors comes from understanding the material science of grip, chemical compatibility with your floor’s finish, and choosing systems that protect both the person and the property for the long term. This guide moves beyond temporary fixes to provide expert, durable solutions.
That beautiful area rug, meant to add warmth and style, can silently become one of the most significant hazards in a home, especially for seniors. The common fear of a slip on a slick hardwood or tile floor is valid, but the danger often originates from the very item intended to provide comfort. A bunched corner, a sliding edge, or a poorly chosen mat can initiate a fall with devastating consequences. The immediate advice is often to grab the nearest roll of double-sided carpet tape, a quick fix that unfortunately creates long-term problems.
Standard solutions often fail to address the underlying physics and chemistry at play. They may temporarily immobilize a rug but can permanently damage expensive floor finishes through chemical reactions with adhesives. Worse, they provide a false sense of security that degrades over time, failing exactly when you rely on it most. The real key to preventing traumatic falls isn’t just about adhesion; it’s about creating a stable, reliable flooring system.
But what if the solution wasn’t just about sticking things down, but about understanding the science of grip? This guide adopts the perspective of a flooring safety expert, focusing on the material interactions that determine true stability. We will explore why certain materials grip and others slip, how to maintain them, and how to choose solutions that are safe for both people and floors. By focusing on the principles of friction, chemical compatibility, and systematic hazard identification, you can transform your home from a collection of potential trip points into a genuinely secure environment.
This article will detail the severe risks posed by unsecured rugs, provide expert methods for maintaining grip, compare the most common securing solutions, and offer strategies for identifying and neutralizing every type of flooring hazard, from curling corners to slippery socks. Let’s build a foundation of safety from the ground up.
Summary: A Material-Focused Guide to Rug and Floor Safety
- Why a Slip on a Throw Rug Is the #1 Cause of Senior Hospitalization?
- How to Clean Rubber Bath Mats Without Destroying the Grip?
- Carpet Tape or Rubber Underlays: Which Protects Floors and People?
- The Curling Corner Hazard and How to Flatten It Instantly
- Which Door Mat Best Traps Snow and Rain to Keep Floors Dry?
- How to Identify Hidden Fall Hazards in Your Hallways in 10 Minutes?
- Why Wool Socks Are a Death Trap on Tile Floors?
- How to Choose Indoor Footwear That Prevents Slipping on Hardwood?
Why a Slip on a Throw Rug Is the #1 Cause of Senior Hospitalization?
While the statement may feel like an exaggeration, the data surrounding senior falls paints a grim picture. A simple slip on an unsecured throw rug is not a minor incident; it’s a primary trigger for a cascade of life-altering events. For adults over 65, falls are the leading cause of injury-related death and the most common cause of nonfatal trauma-related hospital admissions. According to CDC data, more than one out of four older people falls each year, and throw rugs are a major contributor to these statistics.
The danger lies in the sudden and unexpected nature of the event. The body has no time to brace for impact, leading to severe injuries. Falls are the most common cause of traumatic brain injuries (TBI), which can have permanent cognitive and physical consequences. Hip fractures are another frequent and devastating outcome. These injuries are not just physically painful; they mark a critical turning point in an individual’s independence and overall health.
The consequences extend far beyond the initial injury. The financial burden is immense, with non-fatal fall injuries among older adults costing billions annually. More alarmingly, the recovery process is often incomplete. Academic research highlights the long-term impact: in elderly patients who survive their hip fracture, 29% have not returned to their baseline levels of functioning even one year later. This loss of function often leads to a fear of falling, reduced activity, social isolation, and a significant decline in quality of life. The throw rug, therefore, becomes a gateway to hospitalization and a potential end to independent living.
How to Clean Rubber Bath Mats Without Destroying the Grip?
A rubber bath mat provides critical traction in one of the most hazardous areas of the home. However, improper cleaning can destroy its most important feature: its grip. The safety of a rubber mat comes from its surface texture—a series of microscopic peaks and valleys that create a high coefficient of friction, even when wet. Aggressive cleaners, hard-bristle brushes, or high heat from a dishwasher can abrade this texture and break down the rubber, making it smooth and dangerously slick.
The goal of cleaning is not just to sanitize, but to perform surface texture restoration. Over time, soap scum and hard water mineral deposits (like limescale) fill in the microscopic valleys of the mat’s surface, effectively smoothing it out and reducing its gripping power. A mild acidic solution is the key to dissolving these deposits without harming the rubber itself.
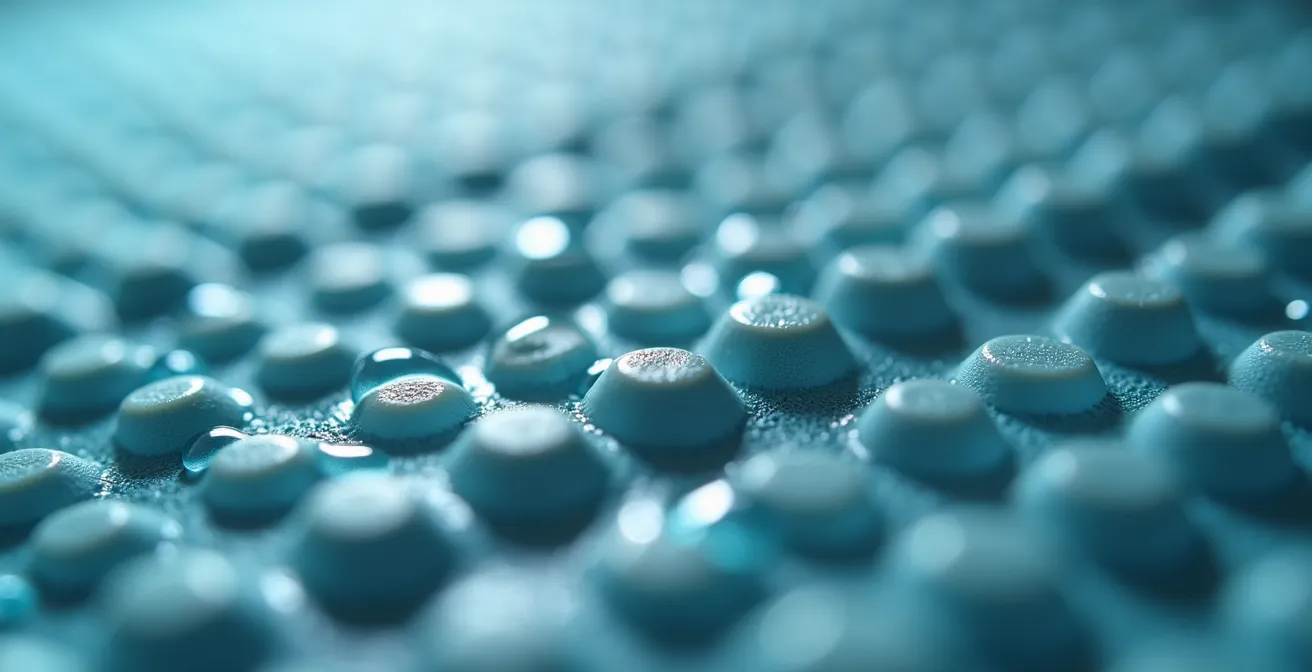
As seen in the texture detail above, maintaining these intricate patterns is essential. A gentle, methodical approach preserves the material’s integrity. Follow this grip restoration method to ensure your mat remains a safety device, not a hazard.
- Prepare a Mild Acidic Solution: Mix a solution of 1 part white vinegar to 3 parts warm water. This is strong enough to dissolve mineral buildup but gentle on the rubber.
- Soak the Mat: Let the mat soak in the solution for at least 30 minutes. This allows the acid to break down limescale and soap scum without any need for harsh scrubbing.
- Gentle Brushing: Use a soft-bristle brush in gentle, circular motions. This helps dislodge the softened residue from the mat’s texture.
- Thorough Rinsing: Rinse the mat completely with clean water to remove all vinegar residue, which could otherwise slowly degrade the rubber.
- Perform the Grip Test: After drying, perform the “wet-hand squeegee test.” Run your wet hand firmly across the surface. You should feel significant resistance and a “squeaking” grip. If it feels smooth, repeat the process.
Carpet Tape or Rubber Underlays: Which Protects Floors and People?
When an area rug slides on a hardwood floor, the immediate impulse is to use double-sided carpet tape. It’s cheap, accessible, and seems effective. However, from a flooring expert’s perspective, this is often the worst choice for both the floor and long-term safety. The adhesives in many tapes can have a chemical reaction with polyurethane floor finishes, leaving behind a sticky, discolored residue that can be impossible to remove without refinishing the floor. Furthermore, these adhesives can release Volatile Organic Compounds (VOCs).
A high-quality rug underlay, particularly one made of 100% natural rubber, is the professionally recommended solution. Unlike tape, it relies on grip, not adhesive. The open-grid pattern allows the floor to breathe and does not trap moisture. While the initial cost is higher, its longevity and the protection it offers to your flooring investment make it far more economical over time. As experts in the field note, the choice of material is critical. RugPadUSA makes this point clear in their guide:
A plastic rug pad is made using a combination of toxic chemicals like phthalates that can stain your hardwood floor.
– RugPadUSA, How to Keep a Rug in Place on Wood Floors Guide
The decision between tape and an underlay is a classic example of short-term cost versus long-term value and safety. The following table breaks down the key differences to inform your choice, based on an analysis of rug-securing methods.
| Feature | Carpet Tape | Rubber Underlay |
|---|---|---|
| Floor Finish Compatibility | Risk of adhesive damage on polyurethane | Safe for all finishes when using natural rubber |
| Chemical Safety | Possible VOC off-gassing from adhesives | 100% natural rubber is inert and safe |
| Long-Term Durability | Needs replacement every 6-12 months | Can last 5-10 years with proper care |
| Cost | Low initial cost | Higher initial investment |
| Effectiveness | High for small rugs | High for all rug sizes |
The Curling Corner Hazard and How to Flatten It Instantly
A curling rug corner is more than a cosmetic annoyance; it’s a perfect catch-point for a shuffling foot, turning a simple walk down a hallway into a high-risk event. As flooring safety experts note, area rugs can curl at the edges, creating an uneven surface that significantly increases the likelihood of trips and falls. This curling happens for several reasons, including high foot traffic, moisture exposure that causes the backing to shrink, or tension from the rug not being properly secured across its entire surface.
The common advice to place heavy books on a corner is a temporary fix at best. It doesn’t address the underlying material issue. An effective solution requires a tiered approach, diagnosing the severity of the curl to apply the correct remedy. A minor curl from shipping might respond to moisture and weight, but a structural curl from a degraded backing will not.
Applying a fix only to the corners can also create a new hazard: a “bubble” or ridge in the middle of the rug, which is just as dangerous. The key to prevention and a lasting fix is to ensure the entire perimeter of the rug is secured, distributing tension evenly.
Use this tiered approach to address curling corners effectively:
- For Minor, Temporary Curls: Lightly dampen the curled area with a spray bottle or damp towel (do not saturate). Place heavy, flat objects like books on the area and leave for 24-48 hours. This can often reset the fibers.
- For Moderate, Persistent Curls: If the moisture method fails, use high-quality double-sided carpet tape or corner grippers along the entire affected edge, not just the tip of the corner. Press firmly to create a solid bond.
- For Severe, Structural Curls: If the edges of the rug are stiff, brittle, or fraying, the binding may have failed. No amount of tape will fix this. The rug may need professional edge stitching or binding replacement, or it may be time to replace the rug entirely.
Which Door Mat Best Traps Snow and Rain to Keep Floors Dry?
An effective entryway mat is your first line of defense against slips and falls during inclement weather. A wet, slick patch on a hardwood or tile floor is an obvious hazard. The purpose of a doormat is not just to wipe feet, but to actively trap and contain moisture and debris before they are tracked into the home. However, not all mats are created equal. A flimsy, low-pile cotton mat will quickly become saturated and useless, even spreading water around.
The most effective solution, borrowed from commercial building management, is a two-mat system. This involves using two different types of mats with specific functions. As facility experts at Imperial Dade explain, a good matting program can stop up to 90% of tracked-in soil and moisture from entering a building.
- The Outdoor Scraper Mat: Placed just outside the door, this mat’s job is to remove large debris, snow, and grit. It should have a coarse, aggressive texture made from materials like tough rubber or coir. Its primary role is mechanical scraping.
- The Indoor Wiper Mat: Placed immediately inside the door, this mat’s job is to absorb any remaining fine particles and moisture. These mats are often made of absorbent fabrics like olefin or microfiber and, most importantly, should feature a deep, “waffle” or “channel” pattern and a raised rubber edge.
This raised edge, known as a water dam, is a critical safety feature. It acts as a reservoir, trapping water within the mat and preventing it from seeping out onto the surrounding floor. This keeps the hazardous wet zone contained entirely within the mat.
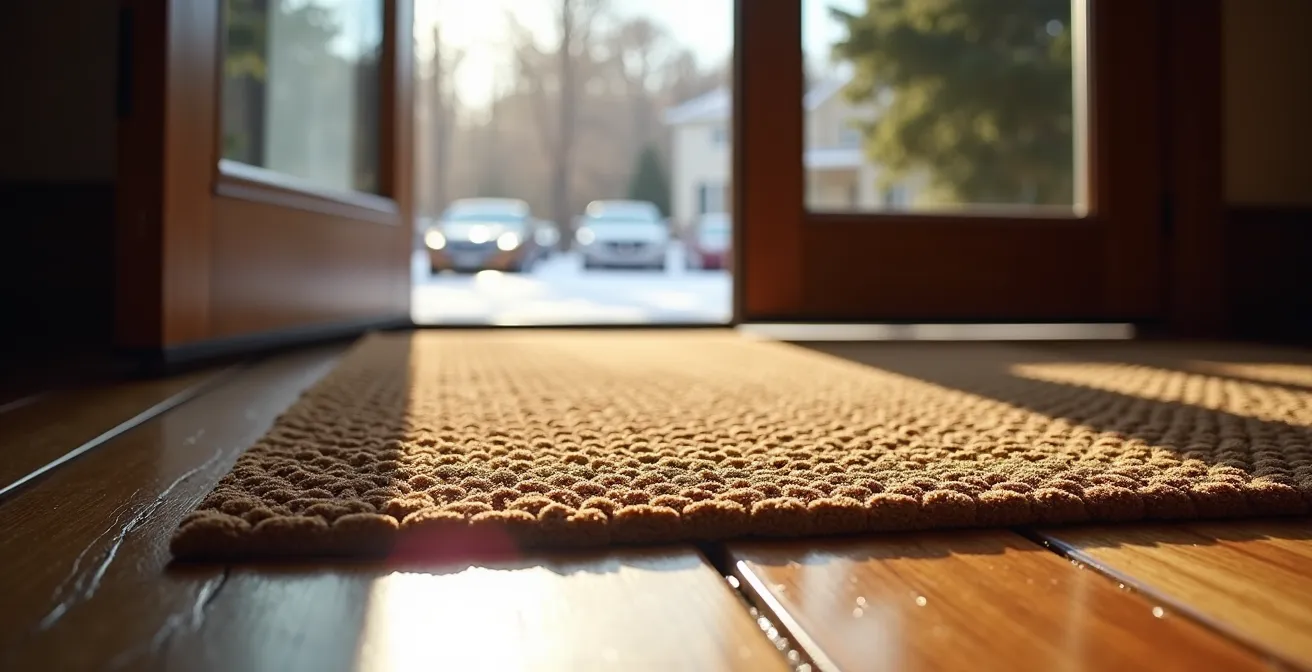
This systematic approach ensures that by the time a person’s foot hits your interior floor, it is clean and dry. When selecting an indoor wiper mat, always look for a substantial rubber backing to prevent sliding and a prominent water dam edge to contain moisture effectively.
How to Identify Hidden Fall Hazards in Your Hallways in 10 Minutes?
While a loose rug is an obvious culprit, many fall hazards are more subtle and integrated into the very structure of your home. They are particularly dangerous in hallways, which serve as the primary arteries for movement, especially for frequent trips like from the bedroom to the bathroom at night. A proactive Gait Path Audit is a simple yet powerful way to see your home through a lens of safety and identify these hidden risks before they cause an accident.
This is not about major renovations. It’s about developing a heightened awareness of small environmental factors that can catch a foot, disrupt balance, or obscure vision. Things like a high-gloss floor finish creating glare from a window, or a transition strip between two flooring types that is just a fraction of an inch too high, can be invisible to a casual observer but a significant obstacle for someone with mobility challenges.
The key is to physically walk the most-used paths in your home and actively look for these subtle points of friction. Pay close attention to areas where you have to turn, as these are common points where balance is challenged. By spending just 10 minutes on this focused audit, you can make simple, low-cost adjustments that dramatically improve safety.
Your 10-Minute Hallway Gait Path Audit Checklist
- Walk Your Common Paths: Trace your most frequent routes, such as from the bedroom to the bathroom or kitchen. Note any spots that require narrow turns or maneuvering around furniture. Is the path at least 36 inches wide?
- Check for Thresholds: Examine every transition between rooms or flooring types. Run your foot over them. Do they catch? Could they snag the wheels of a walker or the tip of a shuffling foot?
- Evaluate Lighting and Glare: Walk the path at different times of day. Is there glare from windows on shiny floors that could obscure your vision or hide a small object on the floor?
- Test for Low-Contrast Transitions: Look at where the floor meets the wall. Is there a clear color distinction? Low-contrast transitions (e.g., beige carpet against a beige wall) can make it difficult to judge distances and position.
- Conduct the ‘3 AM Emergency Test’: Perform the audit in near-darkness, relying only on nightlights. Does the lighting adequately illuminate the entire path to the bathroom without creating disorienting shadows?
–
Key Takeaways
- True rug safety comes from understanding material science, not just using adhesive tape.
- A 100% natural rubber underlay is the expert choice to protect both people and hardwood floors.
- A two-mat system (scraper outside, wiper inside) is the most effective way to keep entryways dry and safe.
Why Wool Socks Are a Death Trap on Tile Floors?
The cozy comfort of thick wool socks on a cold morning can create one of the most dangerous slipping hazards in a home. The combination of smooth, natural fibers (wool) and a hard, non-porous surface (like ceramic or porcelain tile) results in an extremely low Dynamic Coefficient of Friction (DCOF). In simple terms, DCOF is a measurement of the frictional resistance, or “grip,” on a surface when an object is in motion across it. A low DCOF means a very slippery surface.
To combat this, the tile industry has established strict safety standards. The American National Standards Institute (ANSI) has a specific requirement for flooring intended for interior spaces that may get wet. According to the Tile Council of North America (TCNA), the standard requires tile products to have a DCOF of 0.42 or greater to be considered safe for walking on when wet. This provides a baseline level of traction necessary to prevent slips.
When you wear wool socks on a dry, polished tile floor, you can easily create a situation with a DCOF far below this safety threshold. The fine, smooth fibers of the wool glide effortlessly over the tile’s sealed surface, with very little to catch on. The risk is magnified by a few factors:
- Dust and Particulates: Any fine dust on the floor acts like microscopic ball bearings between the sock and the tile, further reducing friction.
- Worn Socks: As socks wear, the fibers become even smoother and more compressed, reducing any natural texture that might have provided some grip.
- Shuffling Gait: Seniors are more likely to have a shuffling gait, which means the foot is always in motion across the floor rather than being lifted and placed. This keeps the foot in the “dynamic” (sliding) state where the low DCOF is most dangerous.
While “no socks” is simple advice, understanding the material science behind the risk allows for better solutions, such as choosing footwear with a certified high-DCOF sole material.
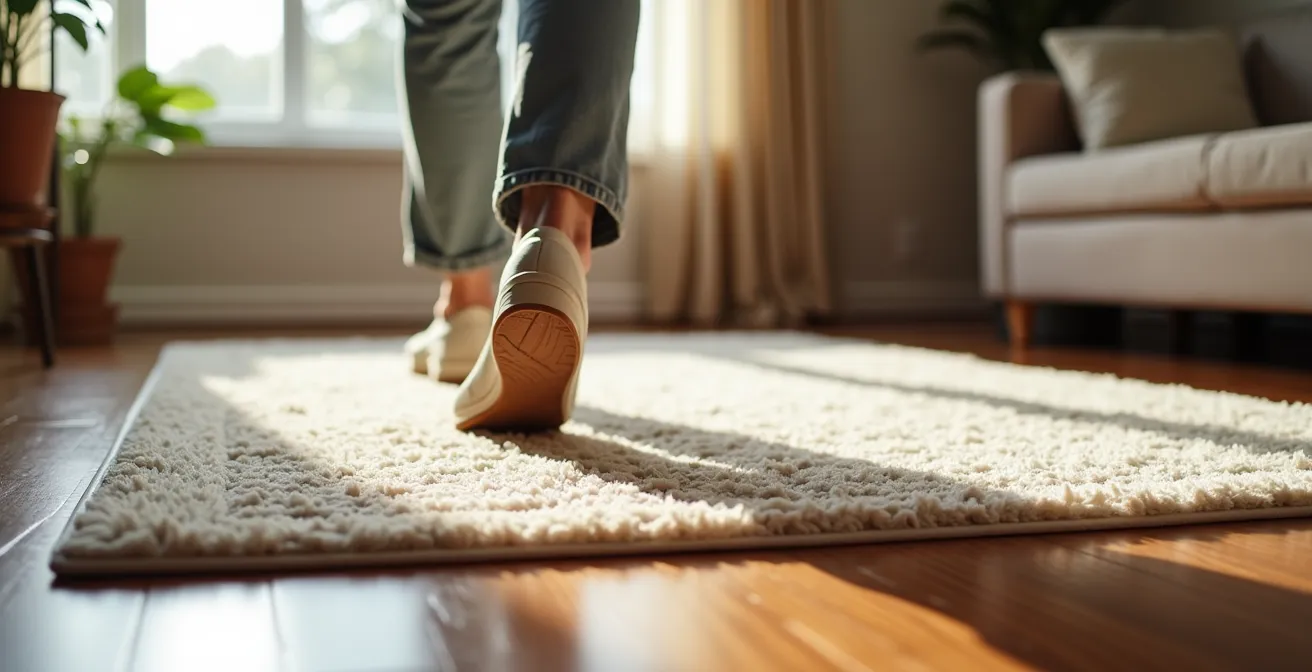
How to Choose Indoor Footwear That Prevents Slipping on Hardwood?
The final layer of floor safety lies in what you wear on your feet. Even on a perfectly secured rug or a high-grip tile floor, the wrong footwear can negate all other precautions. For seniors, choosing indoor footwear is not about fashion; it’s a critical decision about stability and balance. Loose, backless slippers or worn-out socks are a primary contributor to falls, as they provide no support and poor traction.
The ideal indoor shoe or slipper acts as an interface between your body and the floor, enhancing stability. As the experts at Silver Maples Retirement community note, there’s a neurological component to this choice:
Structured footwear provides proprioceptive feedback to the brain, which improves balance and stability.
– Silver Maples Retirement, Fall Prevention for Seniors Guide
Proprioceptive feedback is your body’s ability to sense its own position in space. A floppy slipper sends vague, mushy signals to the brain, whereas a structured shoe with a firm sole sends clear, precise information, allowing the brain to make micro-adjustments to maintain balance. When selecting indoor footwear, use this 5-point checklist to ensure you are choosing for safety.
- Sole Material: Choose natural rubber over felt or smooth plastic (PVC). Rubber maintains a higher coefficient of friction on both wood and tile. Check the sole for any grip certification if possible.
- Tread Pattern: Look for a deep, multi-directional tread pattern. Smooth, worn-out soles are a major hazard. The tread provides channels for dust and microscopic debris to go, ensuring the sole makes solid contact with the floor.
- Fastening System: The footwear must be securely fastened to the foot. Velcro straps or laces are far superior to open-back, slip-on styles. A loose shoe can slip off or twist around the foot at a critical moment.
- Heel & Ankle Support: A firm heel counter (the back part of the shoe) prevents the foot from sliding side-to-side. For those with significant balance issues, a higher-top style that provides some ankle support is even better.
- Weight and Fit: The shoe should be lightweight to prevent fatigue but sturdy. It must fit properly—not too tight to restrict circulation, and not too loose to cause internal foot-sliding.
By systematically addressing each of these areas—securing your rugs with the right materials, maintaining your mats, auditing your hallways, and choosing supportive footwear—you can engineer a home environment that actively promotes stability and significantly reduces the risk of a life-altering fall.