

In summary:
- Standard 30-inch doors are often too narrow for modern electric wheelchairs, requiring modifications for safe passage.
- Non-structural solutions like offset hinges can add up to 2 inches of clear width for minimal cost and effort.
- More significant modifications like pocket doors must be weighed against hidden costs, especially from unexpected electrical wiring.
- Choosing impact-resistant materials for trim and door protection is crucial for long-term durability.
- Properly vetting a contractor’s aging-in-place experience is as important as the technical solution itself.
For homeowners facing new mobility challenges, navigating their own home can suddenly become an exercise in frustration. A standard doorway, once an afterthought, is now a significant barrier. While the immediate thought might be a major renovation, the reality is that many effective solutions exist that don’t involve the costly and complex process of moving load-bearing walls. This is a critical distinction, as modifying a load-bearing structure requires engineering oversight, permits, and significant expense.
The common advice often circles around two extremes: simple DIY fixes or full-scale demolition. However, a more strategic, engineering-focused approach lies in between. This approach is about making informed trade-offs—understanding the mechanics of a hinge, the spatial requirements of a pocket door, and the material science of durable trim. It’s a game of inches where every decision impacts both accessibility and your budget.
The key isn’t just about making a doorway wider; it’s about achieving the maximum functional clear width and maneuvering clearance with the minimum structural intervention. This guide provides a consultant’s perspective on the technical solutions, hidden risks, and smart planning required to transform your home for wheelchair access, ensuring every modification is both effective and compliant without compromising your home’s structural integrity.
For those who prefer a visual format, the following video offers a different perspective and a break from the technical details of this guide.
This article will guide you through the critical assessments and solutions for improving home accessibility. We will break down the problem, from understanding why standard doors are insufficient to comparing modification options, identifying financial pitfalls, and selecting the right professionals for the job.
Contents: A Technical Guide to Doorway Widening
- Why a Standard 30-Inch Door Is Insufficient for Modern Electric Wheelchairs?
- How to Gain 2 Inches of Door Width Using Offset Hinges in 20 Minutes?
- Pocket Doors or Swing Away Hinges: Which Saves More Maneuvering Space?
- The Wiring Mistake That Adds $2,000 to Your Door Widening Project
- How to Select Impact-Resistant Door Trim to Prevent Wheelchair Scuffs?
- How to Vet a Contractor for Aging-in-Place Experience?
- Three-Wheel Turners or Four-Wheel Stabilizers: Which Is Best for Indoors?
- How to Plan an Accessible Road Trip With a Wheelchair?
Why a Standard 30-Inch Door Is Insufficient for Modern Electric Wheelchairs?
The primary issue with standard interior doors is the critical difference between the door’s nominal size and its actual “clear width.” A 30-inch door does not provide 30 inches of usable space. Once the door is opened to 90 degrees, the door slab itself and the doorstop trim intrude into the opening, reducing the passable space to approximately 28 inches or less. This creates a significant problem when considering the dimensions of modern mobility devices.
While a basic, narrow manual wheelchair might just squeeze through, today’s electric wheelchairs are often wider and more complex. They feature larger wheels, wider armrests, and more powerful motors. In fact, an analysis of available models shows that wheelchair widths can range from 21 to 40 inches depending on the type, from narrow transport chairs to heavy-duty bariatric models. A 28-inch clearance leaves no room for error, leading to scraped knuckles, damaged door frames, and a stressful navigation experience.
Furthermore, it’s not just about passing straight through. Accessibility requires maneuvering clearance. The user needs space to approach the door, turn, and operate it. The Americans with Disabilities Act (ADA) specifies a minimum clear width of 32 inches for door accessibility in commercial settings for this very reason. While not legally mandated for most private residences, this standard serves as a crucial benchmark for true, comfortable accessibility. A standard 30-inch door simply fails to meet this functional requirement for a growing number of users.
How to Gain 2 Inches of Door Width Using Offset Hinges in 20 Minutes?
One of the most effective and least invasive solutions for increasing doorway clearance is the installation of offset hinges, also known as swing-clear or swing-away hinges. This is a purely mechanical solution that requires no structural alteration. Unlike standard hinges where the pivot point is inside the door jamb, an offset hinge has a Z-shaped design that moves the pivot point outside the frame. When the door is opened to 90 degrees, it swings completely clear of the opening, adding approximately 1.5 to 2 inches of usable width.
This simple change can be the difference between a passable and an impassable doorway. The financial benefit is equally compelling. Compared to the significant construction costs ranging from $700 to $1,500 for reframing a doorway, a set of high-quality offset hinges typically costs between $30 and $50. The installation process is straightforward for anyone with basic DIY skills and can be completed in under 30 minutes.
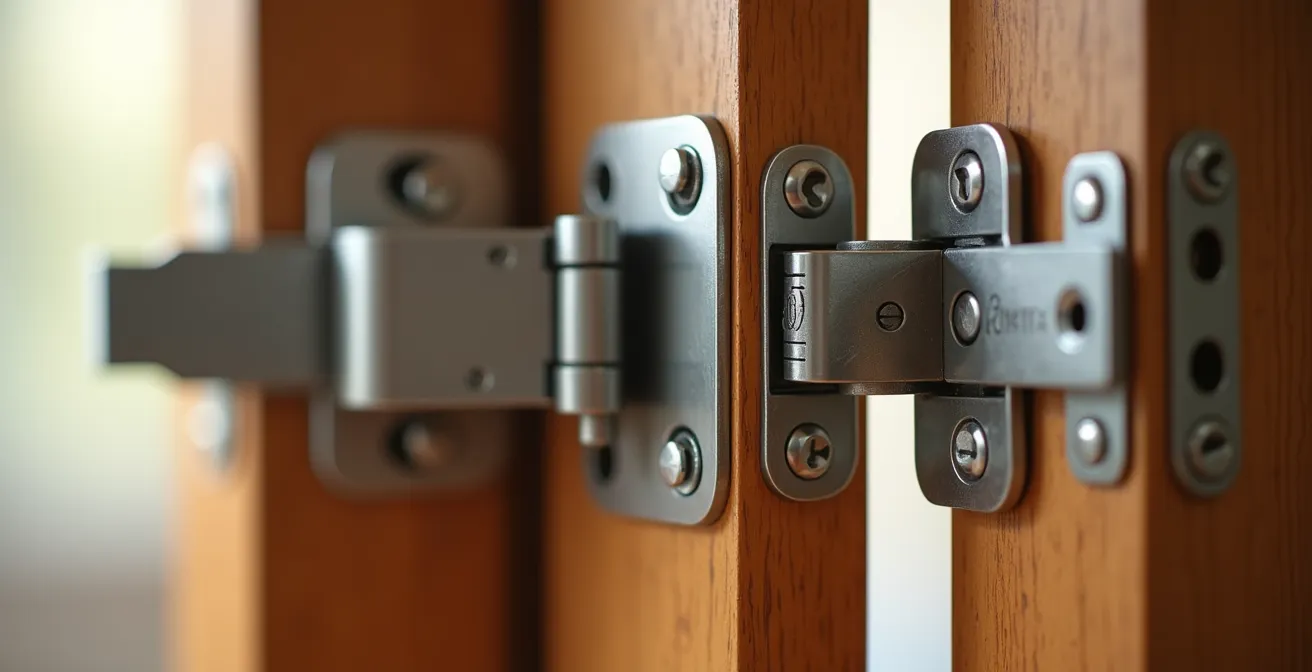
The process involves removing the existing hinges one at a time to keep the door supported, replacing them with the new offset hinges using the same screw holes. This modification is also completely reversible, making it an ideal choice for renters or those who may not need the modification permanently. For a marginal cost and effort, it delivers a substantial improvement in accessibility.
Action Plan: Installing Offset Hinges
- Remove the existing hinges from both the door jamb and the door itself, carefully saving all screws for reuse.
- Attach the first offset hinge to the door slab, ensuring the countersunk holes are facing you for a flush screw fit.
- Use the original screws to mount the hinge into the existing holes, preventing damage to the door.
- Attach the other side of the offset hinge to the door jamb, again using the existing screw holes.
- Test the door’s swing to confirm it opens fully and that the full 2-inch clearance gain has been achieved.
Pocket Doors or Swing Away Hinges: Which Saves More Maneuvering Space?
When choosing between a simple hardware upgrade like swing-away hinges and a more involved modification like a pocket door, the decision comes down to a trade-off between cost, installation complexity, and the type of space gained. Swing-away hinges increase the clear width of the existing opening, but the door slab still swings into the room, occupying valuable floor space. A pocket door, by contrast, eliminates the door’s swing arc entirely.
A pocket door slides into a cavity built inside the wall, freeing up the entire floor area that a swinging door would normally obstruct. This is a massive advantage for maneuvering space, especially in tight areas like bathrooms or narrow hallways where a wheelchair user needs to turn. However, this solution is far more complex and costly. It requires opening the wall, building a frame to hold the door, and then re-finishing the drywall. It’s generally not a DIY project and is best suited for new construction or major remodels.
A good compromise solution can be a surface-mounted barn door, which glides on a track along the wall. It provides the same benefit of eliminating the door’s swing arc without requiring demolition of the wall cavity, though it does require clear wall space for the track.
The following table breaks down the core differences to guide your decision-making process.
| Feature | Pocket Doors | Swing Away Hinges |
|---|---|---|
| Space Saved | Complete door width + swing arc | 1.5-2 inches of width only |
| Installation Cost | $300-800+ (if no obstacles) | $30-50 for hinges |
| Wall Modification | Required (inside wall cavity) | None needed |
| Reversibility | Major renovation to reverse | Easily reversible |
| Best For | New construction/major remodel | Quick accessibility fix |
The Wiring Mistake That Adds $2,000 to Your Door Widening Project
While solutions like pocket doors or fully reframing a doorway offer significant accessibility gains, they carry a hidden risk that can dramatically escalate costs: encountering in-wall infrastructure. The most common and costly mistake is failing to properly inspect the wall cavity for electrical wiring, plumbing pipes, or HVAC ducts before beginning demolition. Cutting into a non-load-bearing wall seems simple, but slicing through a live electrical wire is not only dangerous but also expensive to repair.
Rerouting a single electrical circuit can require an electrician to open up more of the wall, run new wire, install new junction boxes, and ensure everything is up to code. This can easily add $500 to $2,000 or more to the project, depending on the complexity. The same applies to plumbing stacks or supply lines, which are often found in walls adjacent to bathrooms and kitchens. What starts as a straightforward carpentry job can quickly become a multi-trade renovation nightmare.
This risk underscores the importance of a thorough preliminary assessment. Before any cuts are made, a contractor should use a high-quality stud finder with AC wire detection or, in some cases, a small endoscopic camera to inspect the wall cavity. Failing to take this step can turn what should be a manageable project into a major financial burden, with studies showing that what might be a $300-800 project can escalate into thousands due to unforeseen infrastructure repairs. The primary rule is to assume there is something in the wall until you can prove otherwise.
How to Select Impact-Resistant Door Trim to Prevent Wheelchair Scuffs?
Widening a doorway is only half the battle; protecting it from the inevitable wear and tear of daily wheelchair use is essential for long-term durability and aesthetics. Wheelchair footrests, frames, and wheels can quickly cause scuffs, dents, and chips to standard wood or MDF (medium-density fiberboard) door frames and surrounding walls. Selecting the right impact-resistant materials from the outset is a proactive measure that saves on future repairs and maintenance.
The goal is to create a “sacrificial” or highly durable barrier in high-impact zones. This involves a multi-layered approach to protection. Start by choosing a robust material for the door trim itself. Solid PVC or composite trim is an excellent choice as it resists denting and is easy to clean. For a more traditional painted look, high-density fiberboard (HDF) offers better impact resistance than standard MDF.

Beyond the trim, consider adding dedicated protection elements. This is a common practice in commercial buildings that can be adapted for residential use. Key strategies include:
- Chair Rails: Installing a horizontal rail along the wall at the height of the wheelchair’s axle (typically around 26-30 inches) provides a robust barrier.
- Corner Guards: Clear or colored vinyl or stainless steel corner guards can be applied to the outside corners of the doorway, which are highly susceptible to damage during turns.
- Kick Plates: Stainless steel, brass, or high-impact vinyl kick plates should be installed on the bottom 8-12 inches of the door itself to protect against footrest impacts.
- Durable Paint: Using a high-quality, scrubbable semi-gloss or gloss paint on both the trim and the walls near doorways makes it much easier to wipe away scuff marks.
How to Vet a Contractor for Aging-in-Place Experience?
Selecting a contractor for an accessibility modification project goes beyond checking for a license and insurance. You are not just hiring a carpenter; you are entrusting someone with the safety and daily comfort of a resident with mobility limitations. It is crucial to vet for specific experience in “aging-in-place” or “universal design” modifications. A general contractor may know how to frame a wall, but an experienced accessibility specialist understands the nuances of turning radii, threshold heights, and the lived experience of their client.
When interviewing potential contractors, go beyond the standard questions about cost and timeline. You need to probe their expertise and empathy. As the experts at CAPS Remodeling Specialists wisely suggest asking past clients, the critical questions are often about the process, not just the result:
How did the crew manage dust and daily disruption? How did they communicate with the person who actually needed the modifications?
– CAPS Remodeling Specialists, Barrier-Free Remodeling Guidelines
This highlights the importance of a contractor who can work efficiently and cleanly in an occupied home, minimizing stress for the resident. A certification such as a Certified Aging-in-Place Specialist (CAPS) is a strong indicator of dedicated training in this field. However, even without a specific certification, their answers to detailed, scenario-based questions will reveal their true level of expertise.
Checklist: Key Questions for Vetting a Contractor
- Can you describe a past project where you had to adapt a design mid-project to meet a client’s changing mobility needs?
- What specific accessibility certifications, such as CAPS, do your crew members or supervisors hold?
- How do you approach the discovery and handling of unexpected obstacles like hidden wiring or plumbing during a door widening project?
- Can you provide at least two references from recent clients who had similar accessibility modifications done in their homes?
- What is your experience with local building codes and ADA compliance standards as they apply to residential modifications?
Three-Wheel Turners or Four-Wheel Stabilizers: Which Is Best for Indoors?
The design of a mobility device has a direct and significant impact on the accessibility requirements of a home. The choice between a three-wheel mobility scooter (“turner”) and a four-wheel model (“stabilizer”) is a perfect example. While both provide mobility, their geometry dictates very different needs for maneuvering space, especially when navigating doorways and hallways.
A three-wheel scooter is designed for a tighter turning radius. With a single wheel at the front, it can pivot more sharply, making it ideal for navigating narrow hallways and making tight turns into rooms. For a home with 32-inch doorways and a more confined layout, a three-wheel model is often the more practical choice, as it can execute turns that a four-wheel model cannot. However, this agility comes at a cost: three-wheel models are inherently less stable, particularly when crossing uneven surfaces like thresholds.
Conversely, a four-wheel scooter provides a much more stable base, reducing the risk of tipping. This makes it a safer option for crossing thresholds or traveling over varied indoor surfaces. The trade-off is a significantly wider turning radius. A four-wheel model often requires a straight approach to a doorway and may need a 36-inch door or wider to comfortably enter a room from an angle. It is best suited for homes with open floor plans and wider hallways.
The decision between devices and home modifications are interconnected. It is essential to measure the specific device you will be using to ensure any modifications are sufficient. The following table compares the key characteristics for indoor use.
| Feature | Three-Wheel Turner | Four-Wheel Stabilizer |
|---|---|---|
| Turning Radius | Tighter (better for doorways) | Wider (needs more space) |
| Stability at Threshold | Less stable on uneven surfaces | More stable crossing thresholds |
| Best Home Layout | Narrow hallways, tight corners | Open floor plans |
| Doorway Approach | Can pivot within doorway | Needs straight approach |
| Recommended Width | 32-inch doors sufficient | 36-inch doors preferred |
Key Takeaways
- True accessibility is measured in “clear width,” not nominal door size, and modern wheelchairs often require more than the standard 28-inch clearance.
- Non-structural solutions like offset hinges and impact-resistant trim offer significant functional gains with minimal cost and disruption.
- Hiring a contractor with proven aging-in-place experience is paramount to a project’s success, focusing on process and empathy as much as technical skill.
How to Plan an Accessible Road Trip With a Wheelchair?
The principles of assessing and ensuring accessibility within your home can be extended to the world outside. Planning a road trip with a wheelchair requires the same proactive, detail-oriented mindset. Simply relying on a hotel or venue’s website claim of “accessible” is often not enough. True accessibility lies in the specific measurements and features, and verification is key to a smooth and stress-free trip.
The most critical step is to call venues directly before booking. Ask for specific measurements, not just confirmations. What is the exact clear width of the bathroom door? Can they send a photo of the roll-in shower? This level of detail prevents arrival-day surprises. The ADA has design standards for public accommodations, such as requiring that at least 60% of public entrances are accessible, but the quality and maintenance of these features can vary widely.
Beyond lodging and attractions, consider the journey itself. If renting an accessible van, confirm the ramp width and tie-down system specifications. It’s also wise to pack a small “accessibility kit” for unexpected challenges. This might include a portable threshold ramp for single steps, suction-cup grab bars for added hotel bathroom safety, and a list of known accessible rest stops along your route. Using dedicated apps can also help locate accessible services on the go. Planning for travel requires you to become your own accessibility consultant, applying a critical eye to every leg of the journey.
Pre-Trip Accessibility Verification Checklist
- Call hotels directly to confirm exact bathroom door measurements (a minimum 32-inch clear width is a good benchmark).
- Request photos or a video tour of the accessible room, focusing on doorway widths and turning space in the bathroom.
- Verify accessible van rental specifications, including ramp width, interior height, and the type of tie-down systems provided.
- Pack a portable threshold ramp to handle unexpected single steps at restaurants or shops.
- Bring a set of portable, high-strength suction-cup grab bars for temporary installation in hotel bathrooms.
- Download and pre-populate apps that specialize in locating accessible restrooms and venues along your planned route.
To fully implement an accessibility plan, the next logical step is to conduct a comprehensive audit of your own home’s specific needs. Evaluate each doorway, hallway, and room layout to create a prioritized list of modifications. Begin by implementing the most cost-effective, high-impact solutions first to achieve immediate improvements in your daily mobility.